Available only to System Administrators
Comidor integrates perfectly with different applications. The integration is easier now due to the new import/export functionality for Accounts, Contacts, Tasks, Products & Services. You can import all the above in Comidor from different accounts.
However, it is available for simple users to import Contacts and Tasks.
Importing Accounts
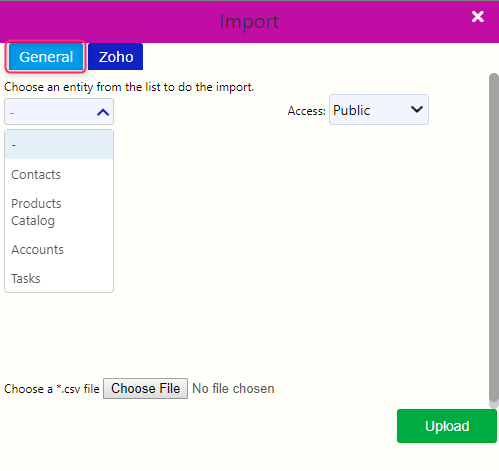
- In order to access Imports, go to Modules Menu Icon > System Administration> Application Setup > Imports. A pop-up window appears which refer to Import.
- Click on General Tab and then select to Import Accounts. Give Access you wish (Public, Private).
- Select the Account’s fields you wish to import.
- Make sure you have the correct Delimiter and the proper Date format both here and in your *.csv file, match the Account’s Fields with their Position in the .csv file and finally, Browse and select the *.csv file and Upload.
Importing Contacts
- In order to access Imports, go to Modules Menu Icon > System Administration>Application Setup > Imports. A pop-up window appears which refer to Import.
- Click on General Tab and then select to Import Contacts. Give Access you wish (Public, Private).
- Select Format (Gmail, Yahoo, Outlook Express, Exchange Server, Hotmail, Other).
- Regarding Gmail, you have to log in to import your Contacts.
- For Yahoo, Outlook Express and Hotmail, follow the instructions to export Contacts on *.csv and then add them here.
- For Contacts from Exchange Server, you have to connect there to import your Contacts.
- Choose “Other” to import Contacts through a *.csv file.
- Match Contacts’ fields with the ones you have on the *.csv file and Import the file.
Check that you use the same Delimiter and Encoding in the *.csv file, click on Browse to load the *.csv file and then click on Check.
Alternatively, you can follow a different path to import Contacts. In order to access Contacts, go to:
- Modules Menu Icon > Integrated Communication > Contacts. A new Unit Action Tab appears with the name Contacts in the Active Units Bar.
- Select the Format Tab of where you would like to import Contacts and then, follow the same procedure as described above.
Click on Actions button and select Import.
- Select the Format Tab of where you would like to import Contacts and then, follow the same procedure as described above.
Importing Tasks
- Select the General Tab and choose Tasks from the list below. Select Tasks Access (Public or Private).
- Choose the fields you have completed in the *.csv file you are about to Import. Options are Title, Date, Time and Duration of the Task.
- Make sure you are using the same Delimiter and Date format in the *.csv file, match the Fields with correct Positions in the *.csv, Browse to find the file and Upload.
Alternatively, you can follow a different path to import Tasks.
- In order to access Tasks, go to Modules Menu Icon > Task Management > Tasks, or Click on Actions button and select Import Tasks.
- A new Unit Action Tab appears with the name Tasks in the Active Units Bar.
- Here, you have the option to import Tasks only with an *.csv file you may have from other application or you had created (option “Other”), but also through Google Calendar and Exchange Server. Select which path you will follow and follow the instructions.
Click on Actions button and select Import Tasks. - Clicking on Google Calendar and Exchange Server tabs you have to connect on these applications to import Tasks. For the Other tab, you have to follow the procedure described above.
Importing Products & Services
- Select General Tab and choose Products Catalog from the list below. Select their Access (Public or Private).
- Choose the fields you have completed in the *.csv file you are about to Import. Select which fields of the Product/Service you have included in the *.csv file.
- Make sure you are using the same Delimiter and Date format in the *.csv file, match the Fields with correct Positions in the *.csv, Browse to find the file and Upload
Importing from Zoho CRM
- In order to access Imports, go to Modules Menu Icon > System Administration> Application Setup > Imports. A pop-up window appears which refer to Import.
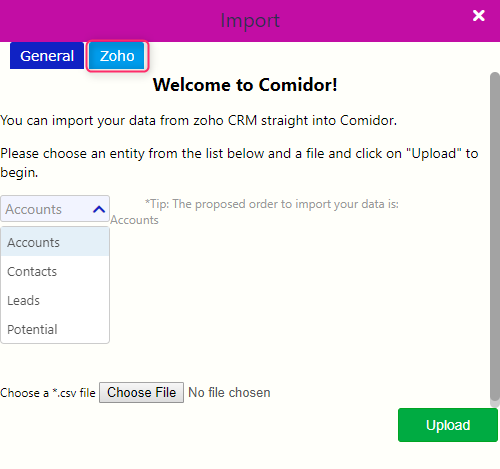
- Select Zoho Tab and choose entity type you wish to Import. Suggested order to import is first Accounts, then Contacts followed by Leads and Potentials. Each time, Browse the *.csv file and Upload it on Comidor.