Digital Signature & Signature Models
Most business processes include authorisation steps and document approvals.
With the Comidor Signature Models & Digital Signature component you can automatically include digital signatures to PDF documents.
Incorporate the Comidor digital signatures in your business processes with the following steps:
- Draw or upload your personal signature
- Create a signature model
- Connect the digital signature component in your workflow
With Comidor Signature Models & Digital Signature component you can:
- Enhance process automation
- Eliminate errors
- Save processing time
1. Draw or upload your personal signature
Every user can specify their own digital signature, which can be used in PDF documents of a workflow.

- Go to the user icon on the top right of your screen > Settings.
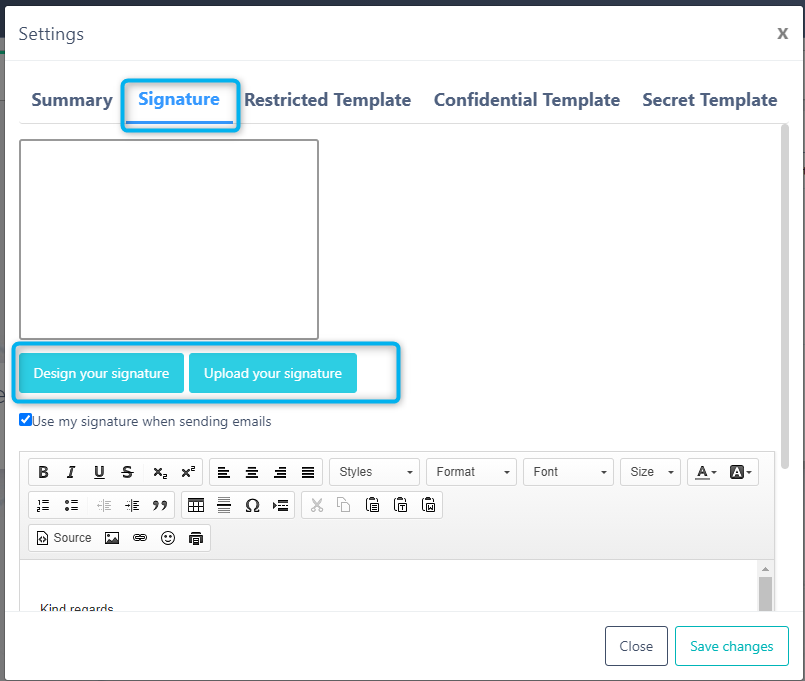
- In the pop-up window, select the Signature tab.
- You can click on the “Design your signature” button.

- In the pop-up window, you can draw your signature with your mouse.
- Click on the “Clear” button to erase your drawing or on “Sav”e to store it.
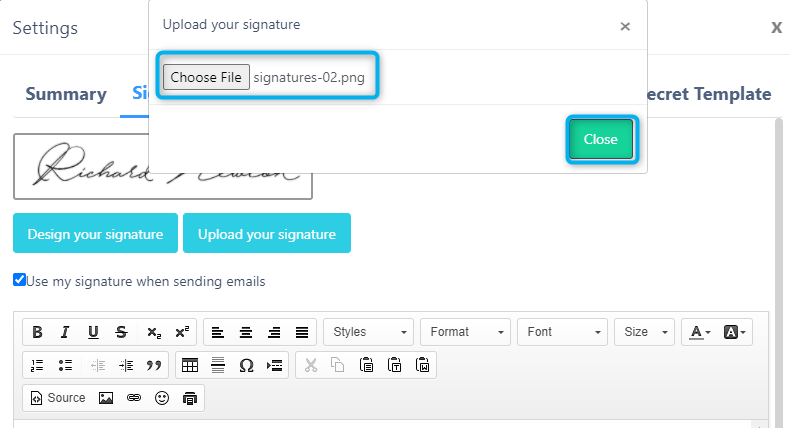
- Alternatively, click on the “Upload your signature” button to upload an image file from your desktop.
- Click on “Save Changes” so as to store the signature settings.
- A refresh of your browser is also required.
2. Create a signature model
In the second step, you should create one or more signature models, to provide PDF templates with the pages and exact parts of the document where you wish the signatures to be added.
To access Signature Models, go to App Factory Icon > RPA & AI/ML > Signature Models.
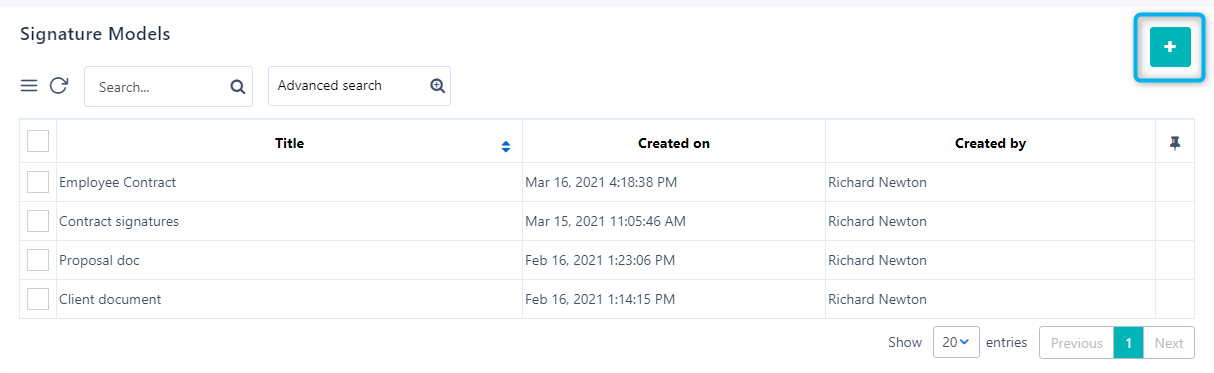
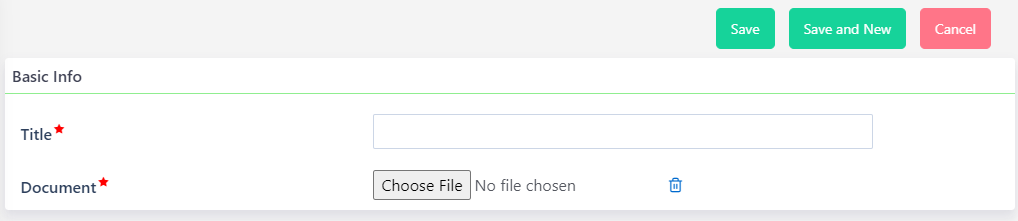
- Click on the + Icon at the top of the screen to open the Creation Form.
- Type a Title for your Signature Model.
- Choose a Document in PDF format as your template.
- Select the desired Save option (refer to the Quick Reference Guide).
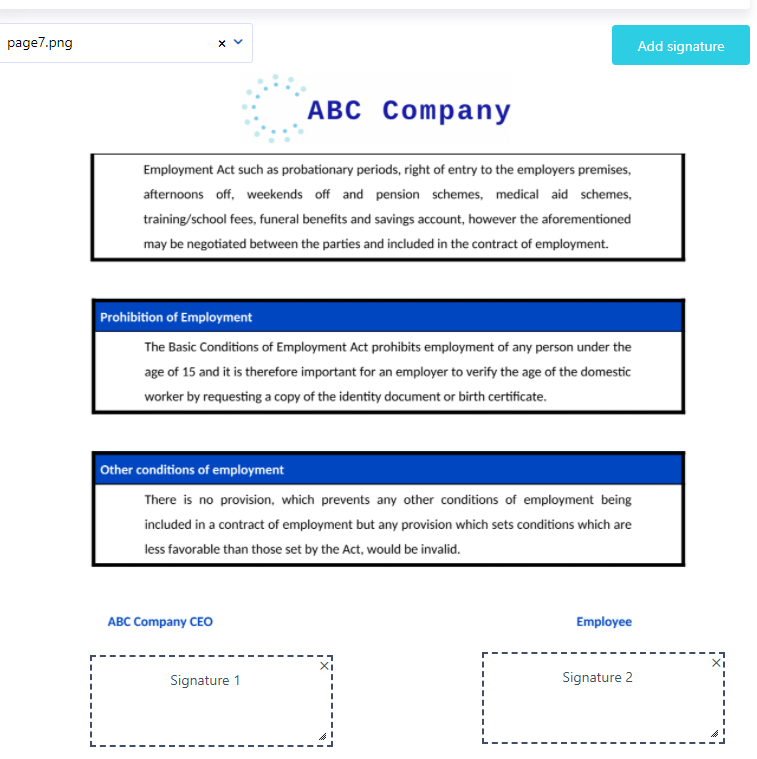
After saving your Signature Model, you can get a preview of the document you uploaded.
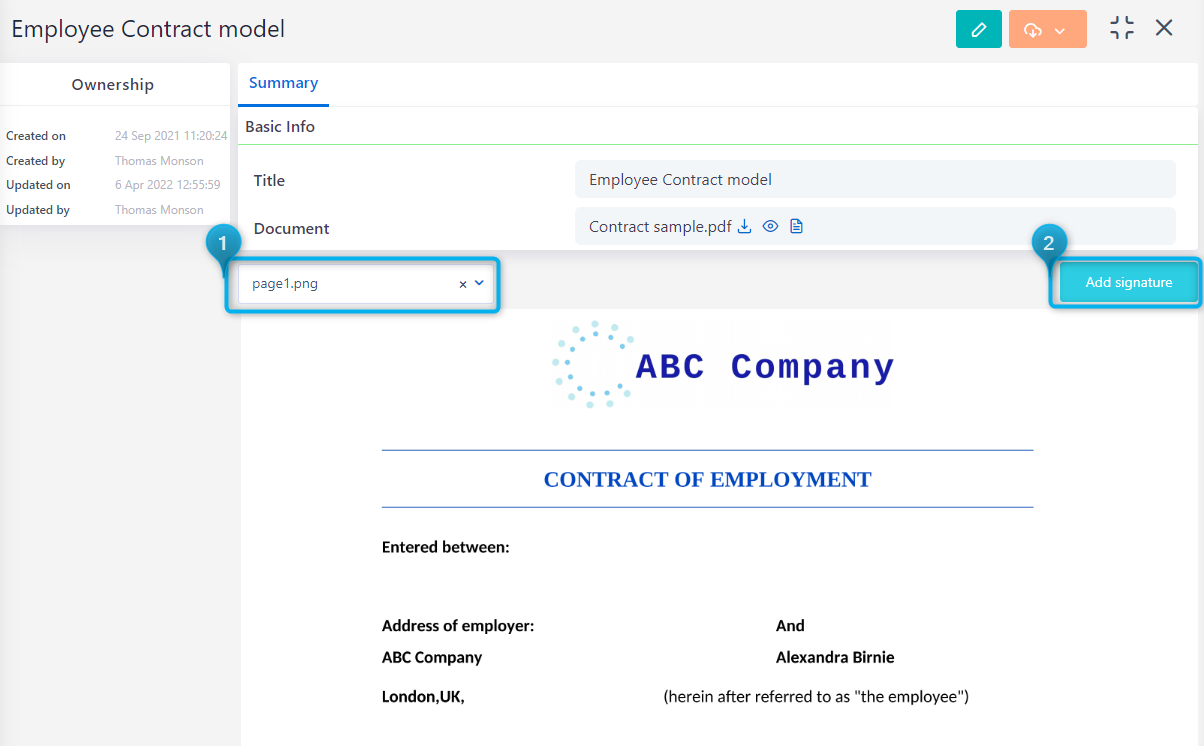
- The document you have uploaded in the creation form is displayed per page so you can select which page you would like to view.
- Click on the “Add signature” icon, to add as many signatures needed to be included in your document.
- A signature box will be displayed in your page with an incremental number as title (Signature 1, Signature 2, etc).
- You can drag-and-drop the signature box and place it easily in the spot you wish to be displayed.
- The signature box can be also resized (from the bottom corner) or deleted.
- Any change you made in your model is automatically saved.
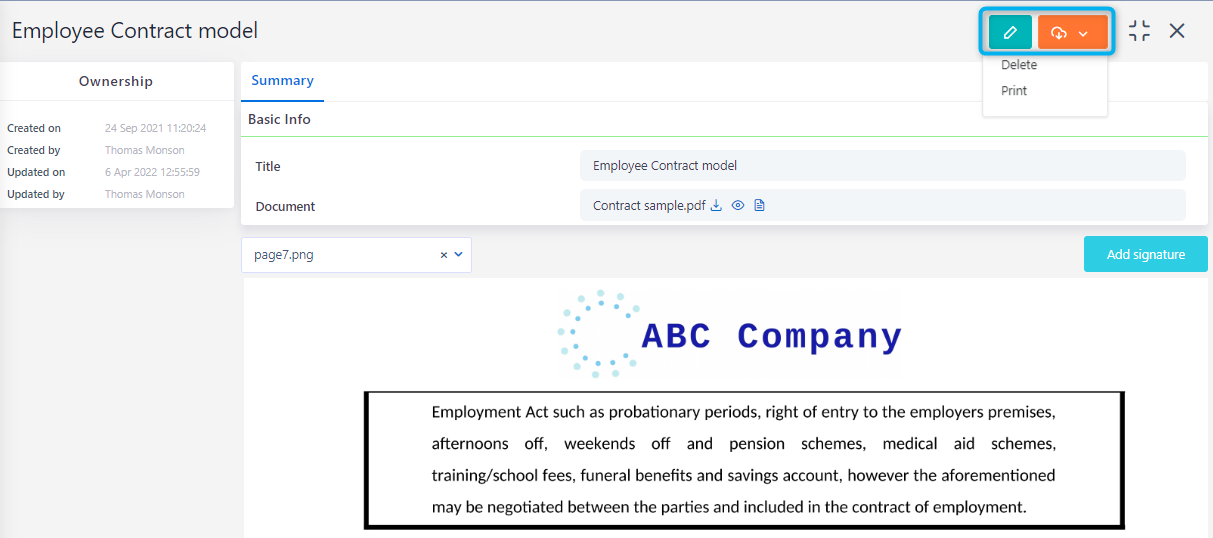
Edit Signature Models
- Go to App Factory Icon > RPA & AI/ML Automation > Signature Models.
- Select the Signature Model to edit.
- Click on the Edit button to open the Edit Form.
- Edit the information you want and click on the desired Save option (refer to Quick Reference Guide)
- Any change you made in your model view form (signature spots, size, etc.) is automatically saved.
Delete Signature Models
- Go to the App Factory Icon > RPA & AI/ML > Signature Models.
- Select one or more Signature Models records.
- Click on Delete to delete one or multiple Signature Models at the same time. A confirmation pop-up box appears.
3. Connect the digital signature component with your workflow
Add a Digital Signature component in the workflow design, to include digital signatures in PDF documents of your process after specific steps/approvals.
There are two options:
- Include a digital signature from a user (as defined in their user settings); the workflow will add it automatically to the place of the document as per the signature model.
- Send an email to a recipient(workflow field), with a link. The email recipient by clicking on the link will be re-directed to another page with the full document. There, the recipient can read the whole document, switch from one page to another, draw his signature, place it in the document, resize it and finally submit it. The workflow will await until the signature is added.
To access Workflows, go to App Factory Icon > Workflow Automation > Workflows and choose the design tab.
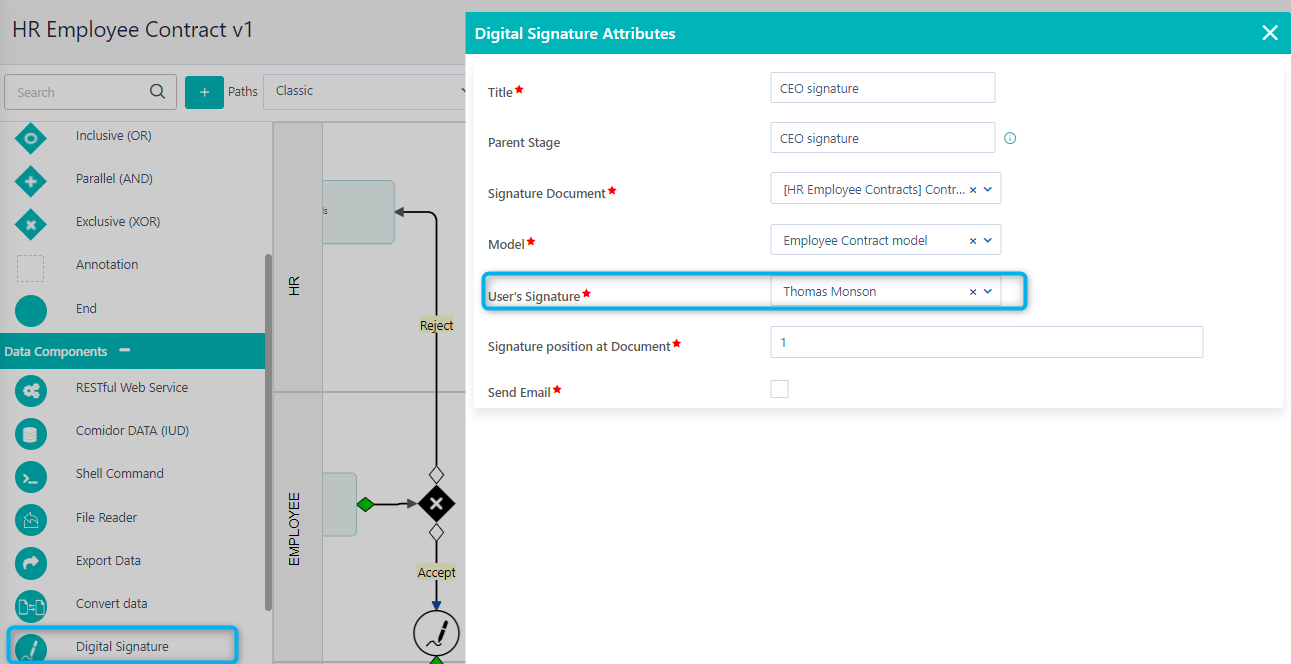
Digital Signature
- Drag and drop the Digital Signature in the workflow pool.
- Give a Title to the component.
- Give the Parent Stage which is the stage of the parent process as soon as this step is reached.
- Signature Document: choose the binary field, where the user will upload the document in PDF format without signatures. After the digital signature component runs, the selected binary field will store the PDF document with the signature.
- Select which Model you would like to run at this step, from the list of the Signature Models that you have already created.
- User’s Signature: choose which user’s signature you want to add to your document.
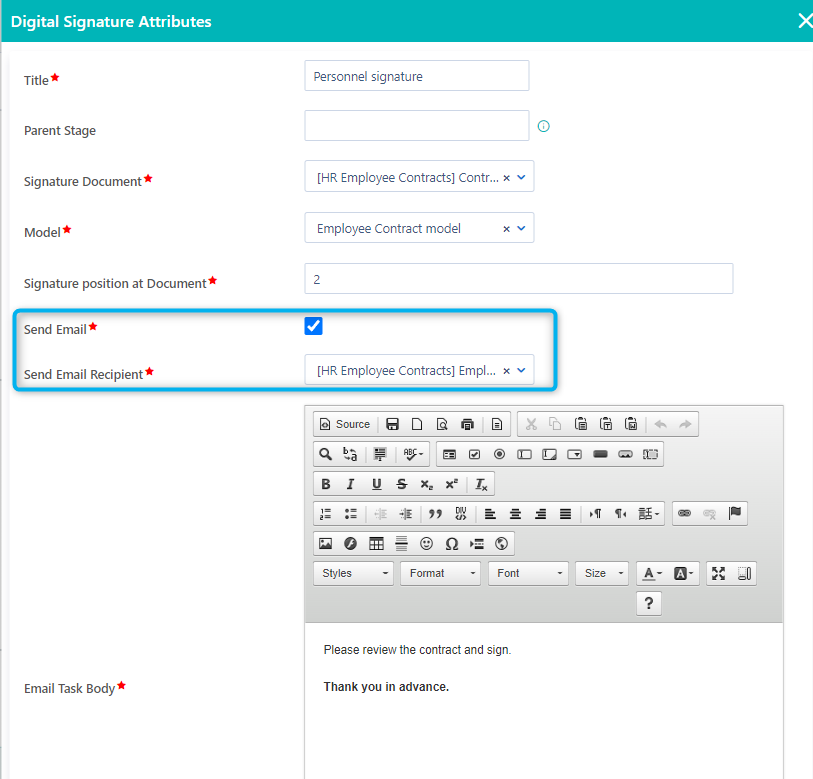
- Signature position at Document: refers to the number of the signature that you need to place in your document (Eg. 1, 2, etc.).
- Check the option Send Email if you want the digital signature to be added by an external user.
- Define the Email Recipient; choose from a list of text/email fields. This field should get value in a previous step of the workflow.
- Type your Email body. With the rich text, you can add colours, styles, and font sizes and fully customize your email message.
Find out more on how to create and manage workflows step by step and learn all about Comidor Workflow Elements.