Artificial Intelligence (AI)
Artificial Intelligence (AI) in BPM is ideal in complicated situations where huge data volumes are involved and humans need to make decisions. Cognitive Automation is capable of performing complex tasks that require extensive human thinking and activities.
Comidor offers some of the key capabilities of Cognitive Automation such as:
- Natural Language Processing (NLP): the ability to understand language, with Sentiment Analysis
- Optical Character Recognition (OCR): the ability to read and understand written text, with Document Analyzer Models
Use the Sentiment Analysis element in a workflow to identify and categorize opinions expressed in a text field of a workflow, and determine whether the writer’s attitude is positive, negative, or neutral.
Benefits of Sentiment Analysis within organisations:
- Develop a more insightful marketing strategy
- Understand your customers better
- Measure your marketing campaigns
- Re-think your brand perception
- Give an extra boost to your customer service
With Comidor Document Analyzer Models enterprises can scan documents like invoices and create digital copies. In particular, the text that is extracted from the document is saved in a text field and can be used within simple or more advanced workflows.
Use Document Analyzer Models and achieve:
- Higher Productivity by retrieving data quicker
- Cost Reduction
- High Accuracy
- Increased Storage Space
- Massively Improved Customer Service
Sentiment Analysis
To access Sentiment Analysis, go to App Factory Icon > Process Automation > Sentiment Analysis.
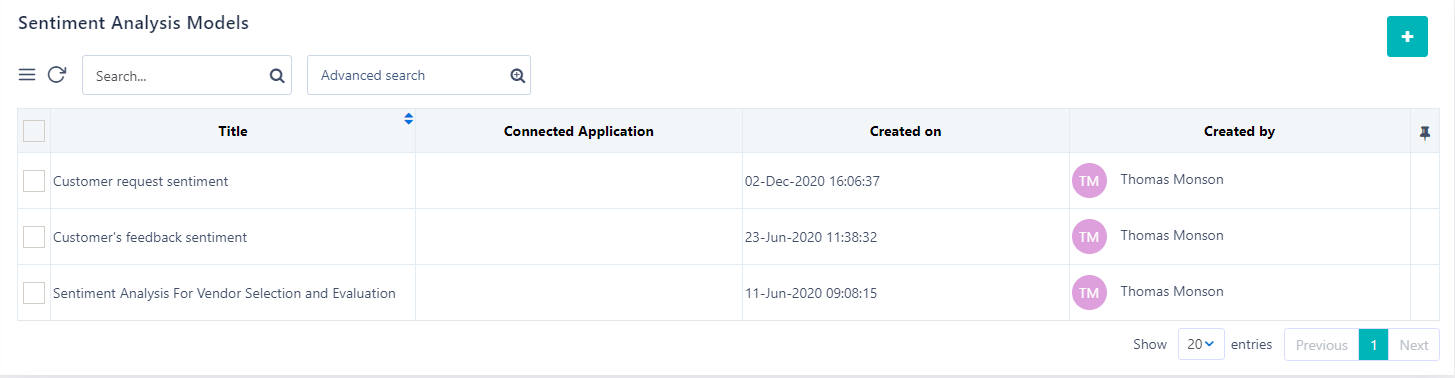
- Click on the + Icon at the top of the screen to open the Create Form.
- Type a Title to your Sentiment Analysis.
- Link this Analysis with a Connected Application or select the respective Entity.
- Define the field in which the Sentiment Analysis should be performed, in Sentiment Analysis Field.
- Select a text or memo field.
- Select the desired Save option (refer to the Quick Reference Guide).

Edit Sentiment Analysis
- Go to App Factory Icon > Process Automation > Sentiment Analysis.
- Select the Sentiment Analysis record to edit.
- Click on the Edit button to open the Edit Form.
- Edit the information you want and click on the desired Save option (refer to Quick Reference Guide)
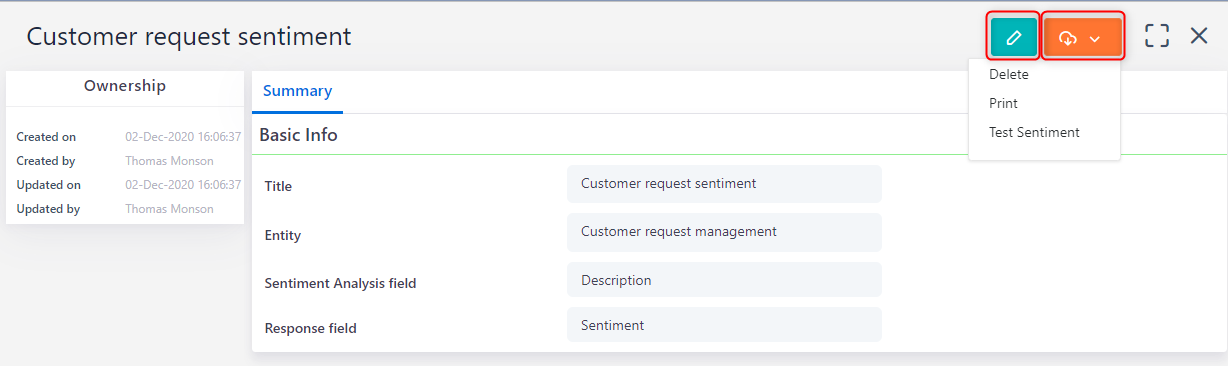
Test Sentiment Analysis
After creating your Sentiment Analysis model, you can test the sentiment results based on data that you type.
- Go to App Factory Icon > Process Automation > Sentiment Analysis.
- Select the Sentiment Analysis record to test.
- Click on the Actions button > Test.
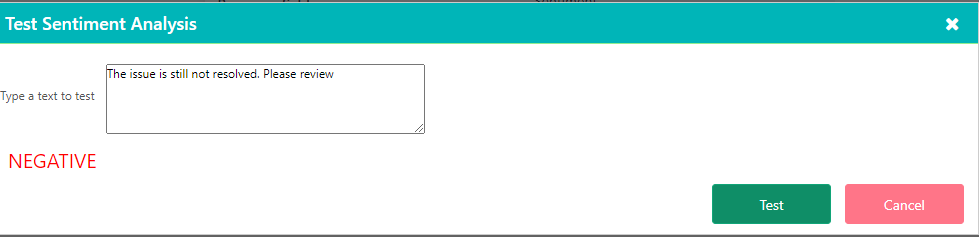
- In the pop-up window, type your test data, click on the Test button and you will see the sentiment result (POSITIVE, NEUTRAL, NEGATIVE).
 Delete Sentiment Analysis Models
- Go to App Factory Icon > Process Automation > Sentiment Analysis.
- Check one or more Sentiment Analysis records.
- Click on Delete to delete one or multiple Sentiment Analysis records at the same time. A confirmation pop-up box appears.
Document Analyzer Models
To access Document Analyzer Models, go to App Factory Icon > Process Automation > Document Analyzer Models.
 Click on the + Icon at the top of the screen to open the Create Form.
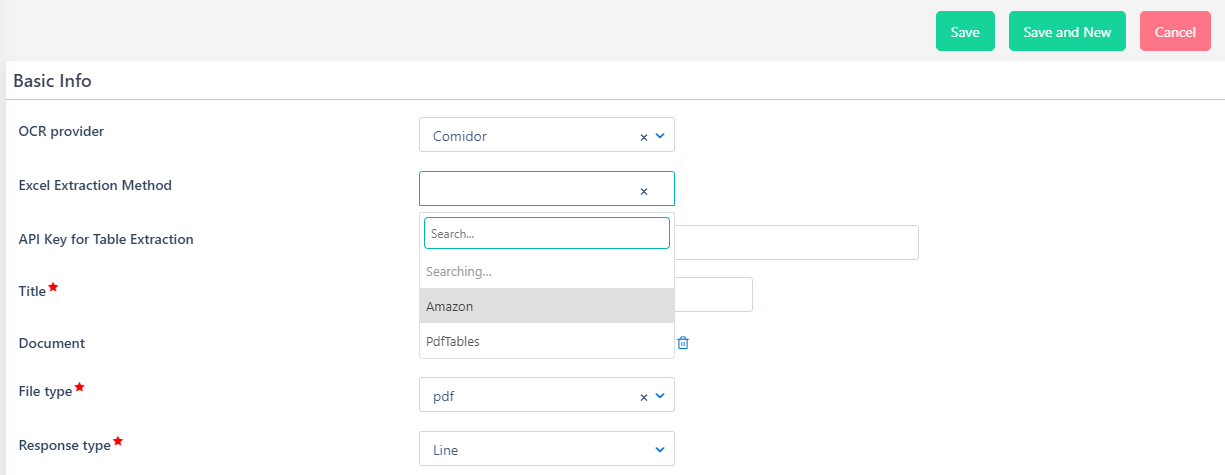
- Select the preferred OCR provider (Amazon, Comidor, or HTML converter).
- Define the Excel Extraction Method(Amazon or PDFTables), if the document you wish to analyze includes tables
- Type a Title to your Document Analyzer Model.
- Choose a file type among PDF, JPG, or PNG from your PC to upload the Document for analysis. This Document will be used as the template in the workflow Document Analyzer.
- Define the Response type to be per Line or per Word.
- Select the desired Save option (refer to the Quick Reference Guide).
Analyze your Document
After uploading the document, and while being at the view form of the Document Analyzer Model, click on the Analyze button.
- OCR provider: Amazon example
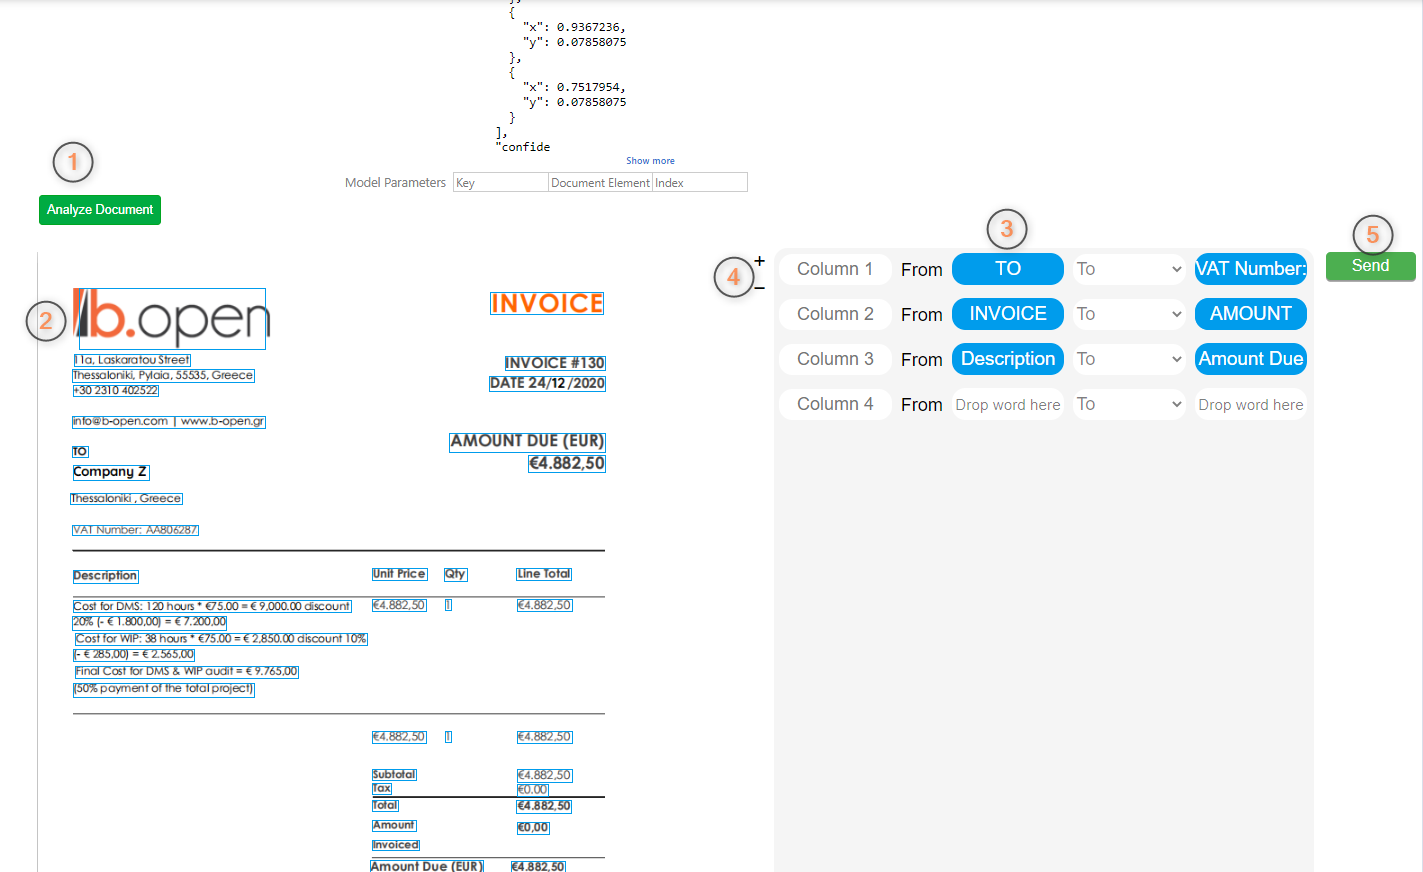
- The Document has been analyzed per the selected options, and the response is saved in Document Analyzer Response.
- You can see the preview of the document, marked with blocks, wherever text was spotted.
- Drag-and-drop the blocks you wish to the right side of the screen and give a name to a parameter to define a section in your document.
- This parameter will be used in the
- Click on the + icon to create more correlations, or on the – icon to remove a row.
- Finally, click on “Send” to save your Parameters in Model Parameters.
- OCR provider: HTML converter example
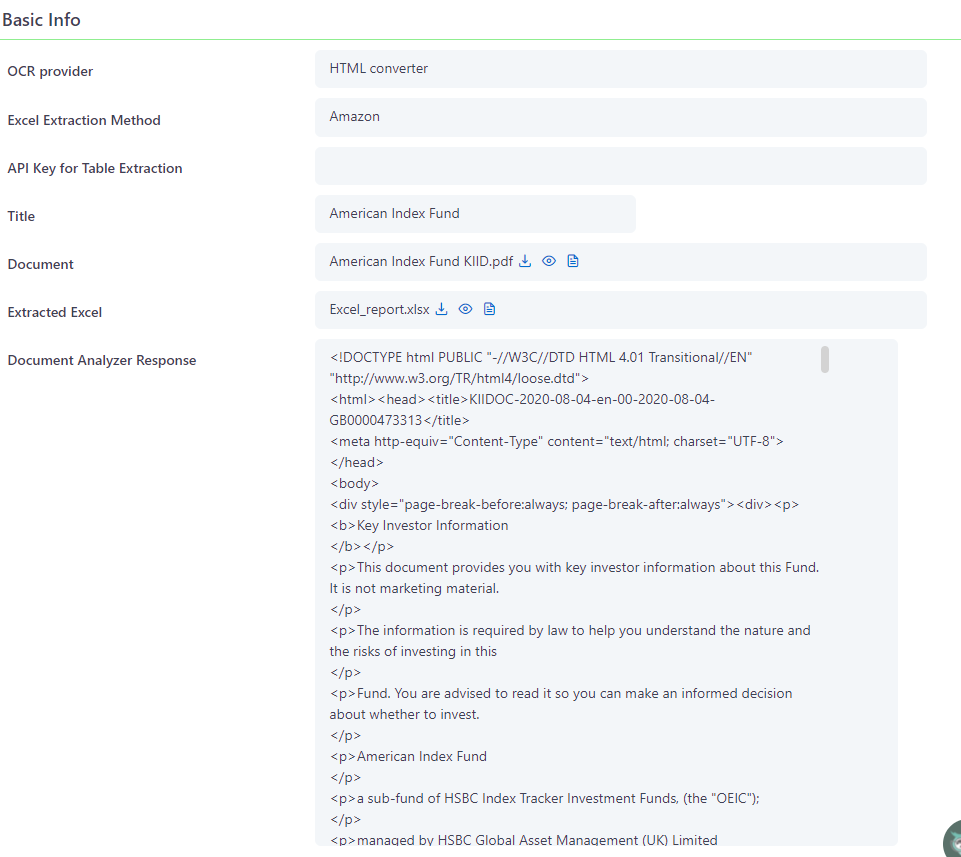
- The Document has been analyzed, converted to HTML and the response is saved in Document Analyzer Response.
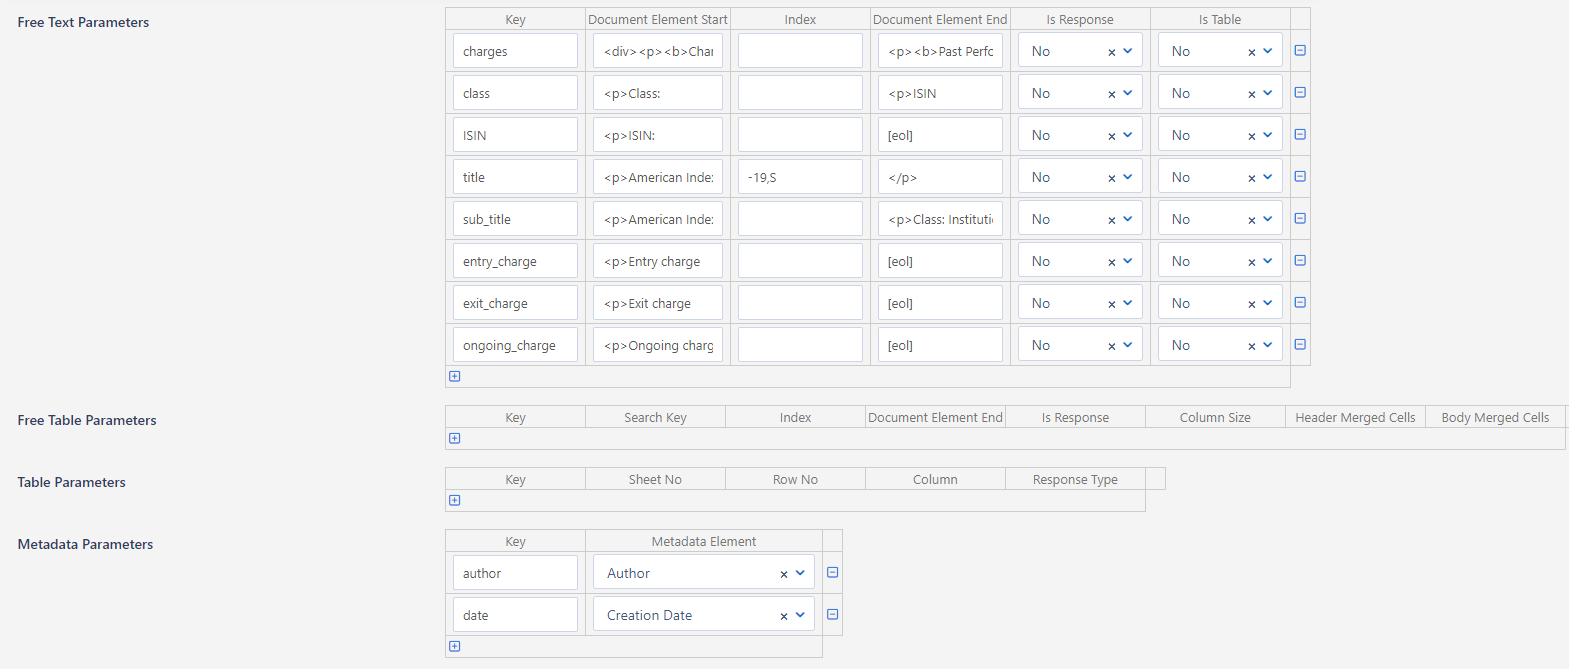
- Click on the pencil button to add Free text parameters:
- In the Key type the parameter name. This parameter will be used in the
- Specify the HTML tag as the Document Element Start and Document Element End to define the area of the document you wish to be captured.
- You can also add [eol] in Document Element End for fetching the text until the end of the current line.
- Use the Index to limit the area of the document you wish to be captured. E.g. if you want to fetch 19 chars prior to Document element start, add “-19,S”. If you want to fetch 7 chars after the Document element end, add “+7,E”.
- In case you want the data from your document to be displayed as a table specify is table Yes in your parameter.
- Add as many parameters as you wish by clicking on the + icon, or remove a row with the – icon.
- Metadata can also be captured from the document. Type the key of the parameter and choose the desired metadata element from the list (Author, Creation date, Title, Subject, etc)
Edit Document Analyzer Models
- Go to App Factory Icon > Process Automation > Document Analyzer Models.
- Select a Document Analyzer Model to edit.
- Click on the Edit button to open the Edit Form.
- Edit the information you want and click on the desired Save option (refer to Quick Reference Guide).
Delete Document Analyzer Models
- Go to App Factory Icon > Process Automation > Document Analyzer Models.
- Check one or more Document Analyzer Models.
- Click on Delete to delete one or multiple Document Analyzer Models at the same time. A confirmation pop-up box appears.
To access Workflows go to App Factory Icon > Business Automation > Workflows
Sentiment Analysis
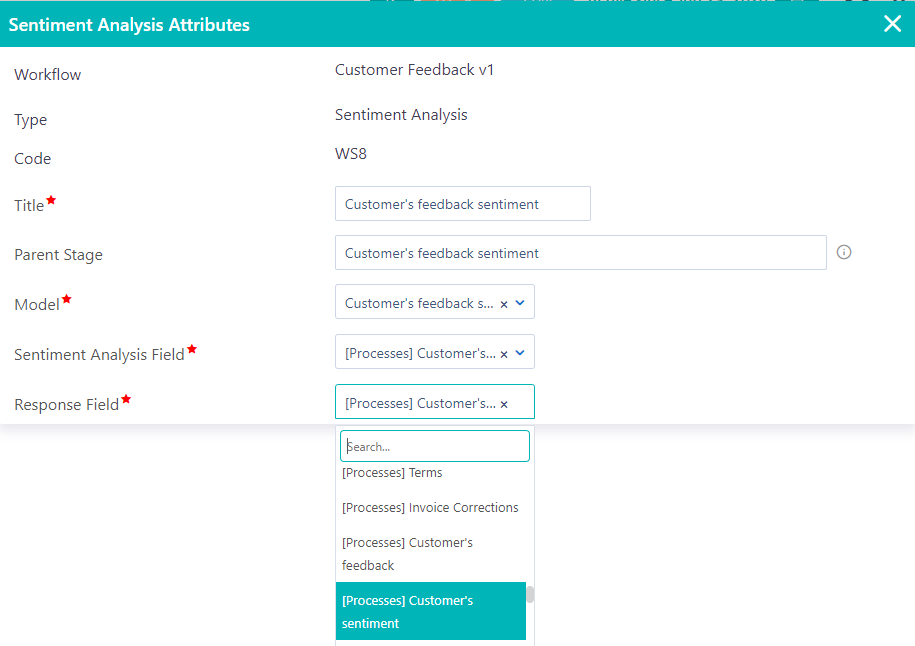
- Drag-and-drop the Sentiment Analysis element.
- Give a Title to the element.
- Give the Parent Stage which is the stage of the parent process as soon as this step is reached.
- Select which Model you would like to run at this step, from the list of the Sentiment Analysis Models that you have already created.
- Define the field in which the Sentiment Analysis should be performed, in Sentiment Analysis Field.
Document Analyzer
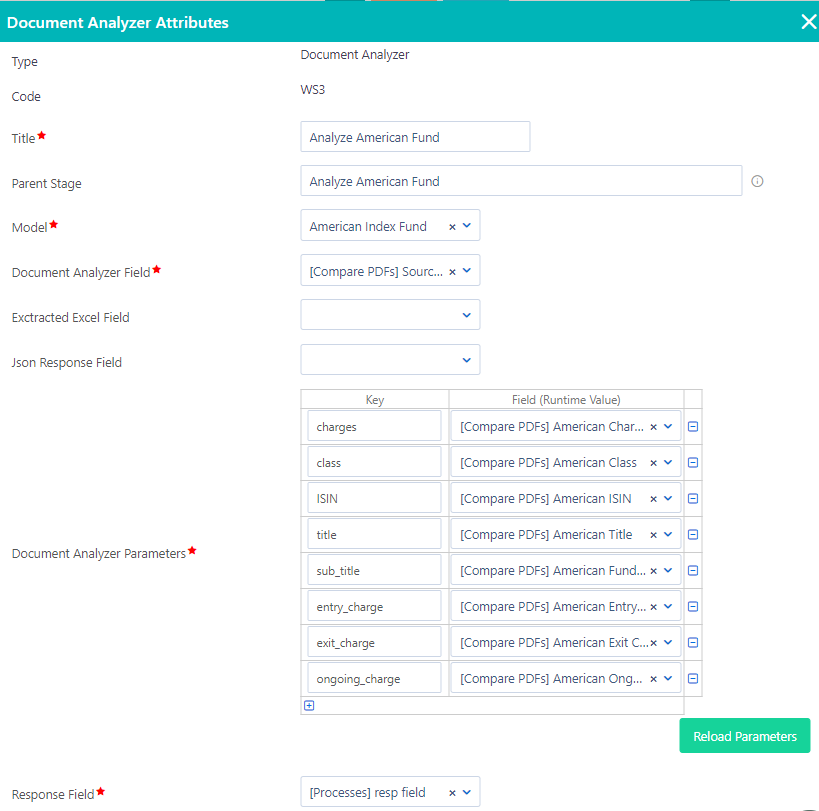
- Drag-and-drop the Document Analyzer element.
- Give a Title to the element.
- Give the Parent Stage which is the stage of the parent process as soon as this step is reached.
- Select which Model you would like to run at this step, from the list of the Document Analyzer Models that you have already created.
- Document Analyzer Field: set the binary field where the user will upload the document to be analyzed.
- You can create a text field and set it as the Response Field, to see the response of this component.
Image Classification
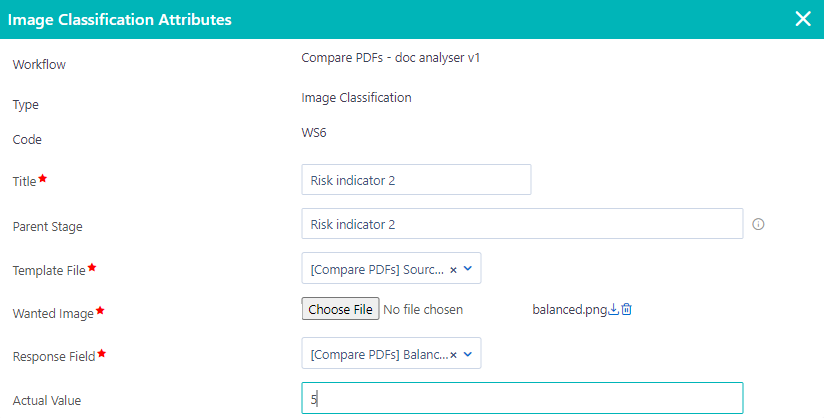
- Drag-and-drop the Image Classification element.
- Give a Title to the element.
- Give the Parent Stage which is the stage of the parent process as soon as this step is reached.
- Select the binary field where you would upload the Template File. The image classification component will search for the wanted image in the Template file.
- Wanted image: upload the .png file from your desktop that you wish the image classification to search for.
- You can create a text field and set it as the Response Field, to see the response of this component.
- Add the Actual value that you would like to be returned in case the wanted image is found in the Template file. If it is not found, the actual value would get -1 as a value.
Find out more on how to create and manage workflows step by step and learn all about Comidor Workflow Elements.