Comidor’s Ticketing system can help organizations handle their Issues and monitor the progress of their resolving path. Tickets are connected with an email receiving these “action-to-do messages” from customers.
Set up your Customer Support email
In order to access Tickets, go to Business Apps > Customer Relations > Tickets. A new Unit Action Tab appears with the name Tickets in the Active Units Bar.
- Click on the Actions button and select Settings to start email set up.
- A pop-up window appears, where you should fill in the following details:
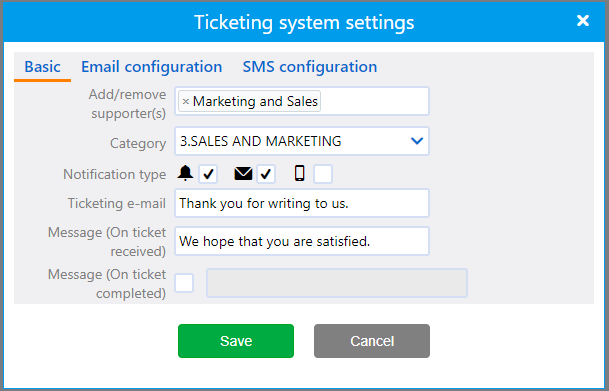
- In the Basic tab complete Add/remove supporter(s): user(s) and group(s) that will have access in every Process of type Ticket that is created.
- Case category: Select the Process Category you have created upon this specific occasion through Lists.
- Notification type: Choose in which way supporter(s) will be notified upon a new Ticket creation. The pre-selected option is Notification, but you may add Email and SMS, too.
- Ticketing Email: This is the field, where you should put the email your company is using to track customer tickets.
- Then, write an auto-reply Message when a ticket is received and a Message when a ticket turns completed.
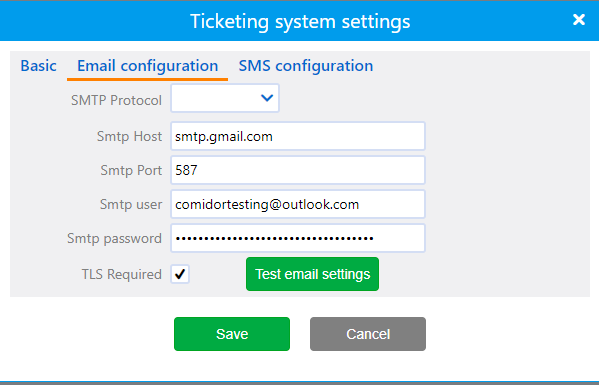
- Email Settings: Fill in your email Display Name, SMTP Host and Port details, SMPT user (the email), SMTP Password and check whether TLS is required.
- Click on Connectivity Test in order to check that connection has been established.
- It is very important to establish a successful connection with your Customer Support email. In case, you experience any Issue, get advice from your System Administrator or contact us directly.
- SMS Settings: In case you want to receive SMS upon each Ticket arrival, you should add these details, too. Fill in Display Name, SMS Gateway, User and Password.
- If you have selected SMS as Notification type in the Basic tab, you have to fill-in the SMS Configuration tab.
- Finally, click on Save.
Handle a Ticket
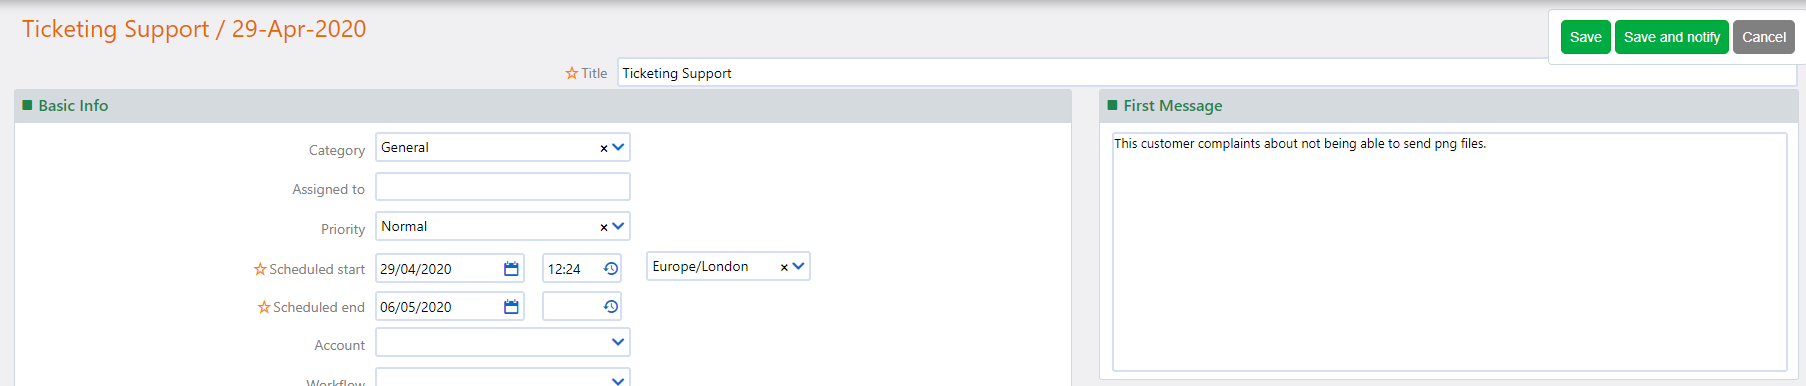
As the email is connected with the Ticketing system, every time someone is sending an inquiry, a new Ticket is automatically created and displayed in the Tickets general view with a unique ticket number on its name and the recipient(s) are also notified through Email/SMS/Comidor Notification in Notifications Bar. Tickets are also Processes that have the pre-selected type of Ticket.
In order to access Tickets, go to Business Apps > Customer Relations > Tickets, or click on the Notification that has arrived.
A new Unit Action Tab appears with the name Tickets in the Active Units Bar and provided that you have chosen to enter that record, you will be able to see its details in the General Summary tab.
Respond to a Ticket
- On Ticket’s General Summary tab, click on Show conversation button to reply back. You have to Connect the email account on your Comidor in order to proceed.
- A pop-up window opens, where you can see the first actual message of the Ticket sender.
- Start writing your message in the HTML Editor and click on Send to reply promptly.
Edit Ticket
- You can Edit Ticket by clicking on the Pencil button and change its details. E.g. Assign it in a different user or group to handle.
- Category: Search for a Process Category and select it or add a new one. See how to add Categories in Data Management.
- Assigned to: Click on Assigned to field in order to see Comidor Users and Groups. You can assign this process in as many as people or groups you wish. This means that people you will select here, are those who will be responsible upon process completion.
- Select Priority (Low, Normal, High, Top) of the Ticket.
- Scheduled Start and End Dates and Times of the Process of type Ticket are pre-set. Click on the check box to set this process start running automatically.
- Moreover, you can Link this Issue with a related Account and a Workflow.
- The state will be stated automatically as Running when the Ticket arrives. You may change it to Completed, Canceled, Paused or Failed.
- Start and End Dates & Times are the execution actual start and end dates and times. They will be displayed when the process starts and is completed.
- Completed (%) is the percentage of process completion, which process holders add and manage manually.
- You may want to add Location Details, such us Country, Address and City information.
- Category: which is the 2nd categorization of Tickets.
- Responsible Group: The group who will have the accountability of this process.
- Select Importance (Normal, High, Top)
- When Region code is set up in Regional Settings, suggested calculated hours give the timeframe of the working hours between scheduled start and end, excluding public holidays, etc.
- You can also link the Ticket with either a Parent process, a Contact, personnel or a Service.
- Estimated workload, is the actual Issue duration, in hours.
- You can read the First original message the sender sent.
- Set users that will be Administrators and Ticket’s Supervisor. Practically, this means that these users will have access on this Process, even if you have not added them in the Basic Info above.
- Send notification to: Fill in Comidor Users and Groups, you wish to receive a notification when someone commented on this Process.
- Additional access: People or/and Groups that should have access to this process, without being necessary to act upon it.
- Change rights: People or/and Groups that could edit this process details in the future. “Everyone” is the default choice. This means that Everyone who has access to this Process will have the right to modify it.
- Finally, click on Save to save the process, on Save and notify when you need to save but also send a Notification message to appropriate people or cancel to cancel the procedure.
- You can Delete a ticket by clicking on the Actions button and select Delete.
Monitor Ticket
- Check Average Handling Time to see how many minutes you have spent from when Ticket arrived until its completion. This is calculated counting the minutes have been passed until the 1st reply to the Ticket sender, then, provided that he is replying back, the counter continues to measure the time it takes you to reply back again for the 2nd time and so on.
- Change Ticket state simply by clicking on the state button on the top right. Then select the state of the process.
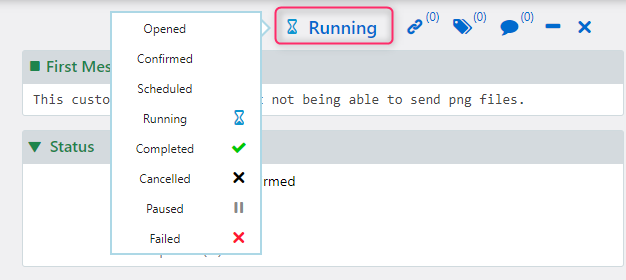
- Select either Confirmed or Scheduled in order to verify and schedule respectively the Ticket that is about to start. A new pop-up window appears, where you can now set a different start time and date or take as granted the suggested time and date. Click on Save.
- Select Running and a new window appears, where user can set the execution time and then, the Ticket state will change.
- Select Paused in order to pause a Ticket for some time. A new pop-up window appears and the user can see the update in execution information.
- Click on Failed, when the user has failed to complete a Ticket, update start and end dates and times, duration (suggestion of tracked or computed duration are available) and quantity and click on Save.
- Click on Canceled on a Ticket that you have canceled, update start and end dates and times, % of completion, duration (suggestion of tracked or computed duration are available) and quantity and click on Save. See the update in Ticket execution information.
- Click on Completed to set a Ticket as complete. Update start and end dates and times, duration (suggestion of tracked or computed duration are available) and quantity and click on Save. See the update in Ticket execution information.
- Click on Notifications at the side-box to see all the notifications regarding this specific Ticket, who received them at which date and time.
- Click on Tags and Links in order to Give a tag on this Ticket and Link it with other Comidor entities such as Accounts, Contacts, Projects, Opportunities, Messages, Files, etc.
Add Tasks in a Ticket
Tasks setting is necessary in order to allocate work in multiple people and groups. Create a Task by clicking on the ‘+’ at the bottom right of the Ticket.
A new form opens. You can create multiple Tasks, enter and monitor them from this point.
Discuss upon a Ticket
Users that have the right to view a Ticket (Users and Users in Groups that you have selected in the fields of a Process: Assigned to, Supervised by, Additional access, Administrator, Administrator 2 and Supervisor) can also read any discussion that occurs inside that Ticket in Notes.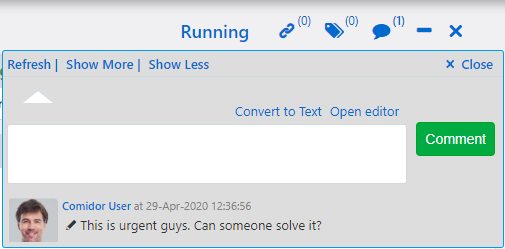
They can click on Refresh to see new comments; click on Show More or Show Less to see the number of comments they wish. Also, they can write a note and click on Comment to see it added.
Only people and people in groups that you have added in “Send Notification to” field receive notifications
Multiple Ticket actions
In order to access Tickets, go to:
- Business Apps > Customer Relations > Tickets. A new Unit Action Tab appears with the name Tickets in the Active Units Bar.
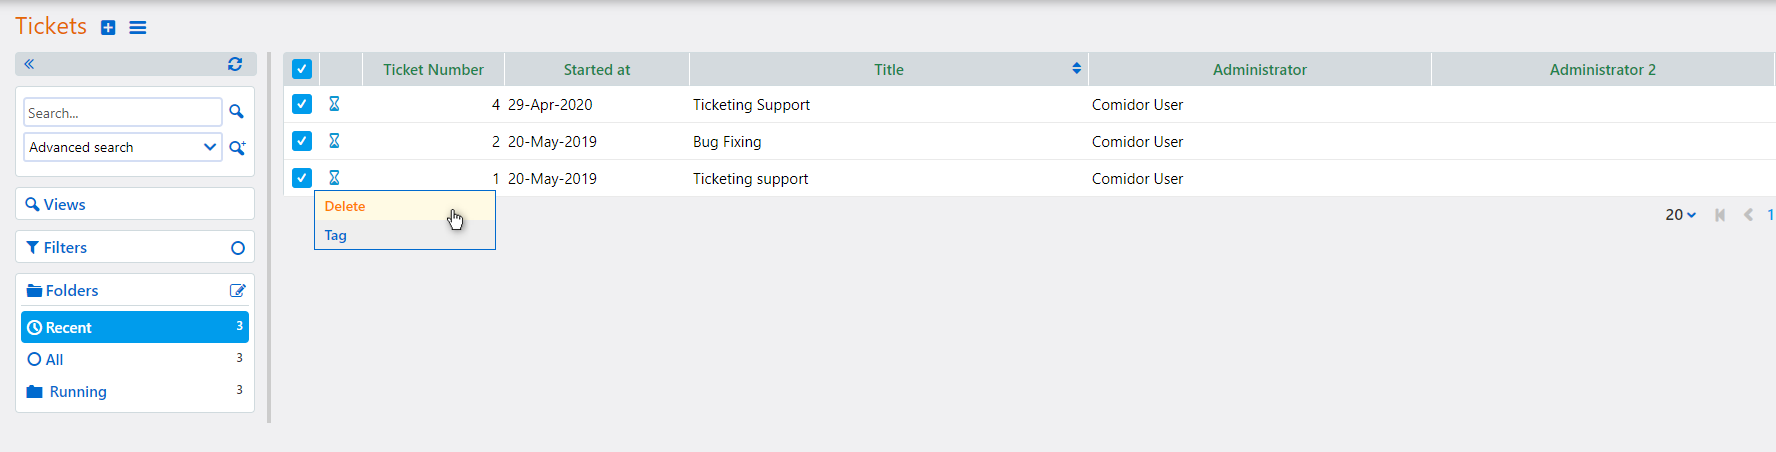
- Multi-check Tickets and click on Delete.
- Make sure prior to this action that you are viewing the searched or filtered or all Tickets after you have sorted and/or grouped them by the way you wish. Check Data Management options for more information about all these below.
- At last, you can quickly add tags to multiple tickets. Simply multi-check the Tickets you want and press Tag.