There are times when user fields need to be more personalized to target specific business needs. Comidor allows you to create User Fields that can be used in multiple Comidor objects globally; those custom User Fields can be added in User Forms in Workflow designs for Workflow automation, too.
User Forms and User Fields are also part of custom applications. So, designers can include their own User Forms and Fields in steps 2 and 4 of App Builder.
- For process enabled apps, designers can create forms to be visible in the main process (primary form, or not), one quick add form(to trigger the app from the Quick add menu), and forms to be shown within workflow tasks.
- For non-process enabled apps, designers must create one main & primary form(choose the option to replace existing form), so that the end-users can have a main form for adding and viewing a record. Additional main forms can be added, too.
Global User Fields and Forms
To manage global User Fields and User Forms, go to App Factory icon > Application Builder > User Fields or User Forms.
Creating a new User Field
To create a new User Field, you should go to Application Builder > User Fields. Then, by clicking on the “+” button the User Field creation form opens.
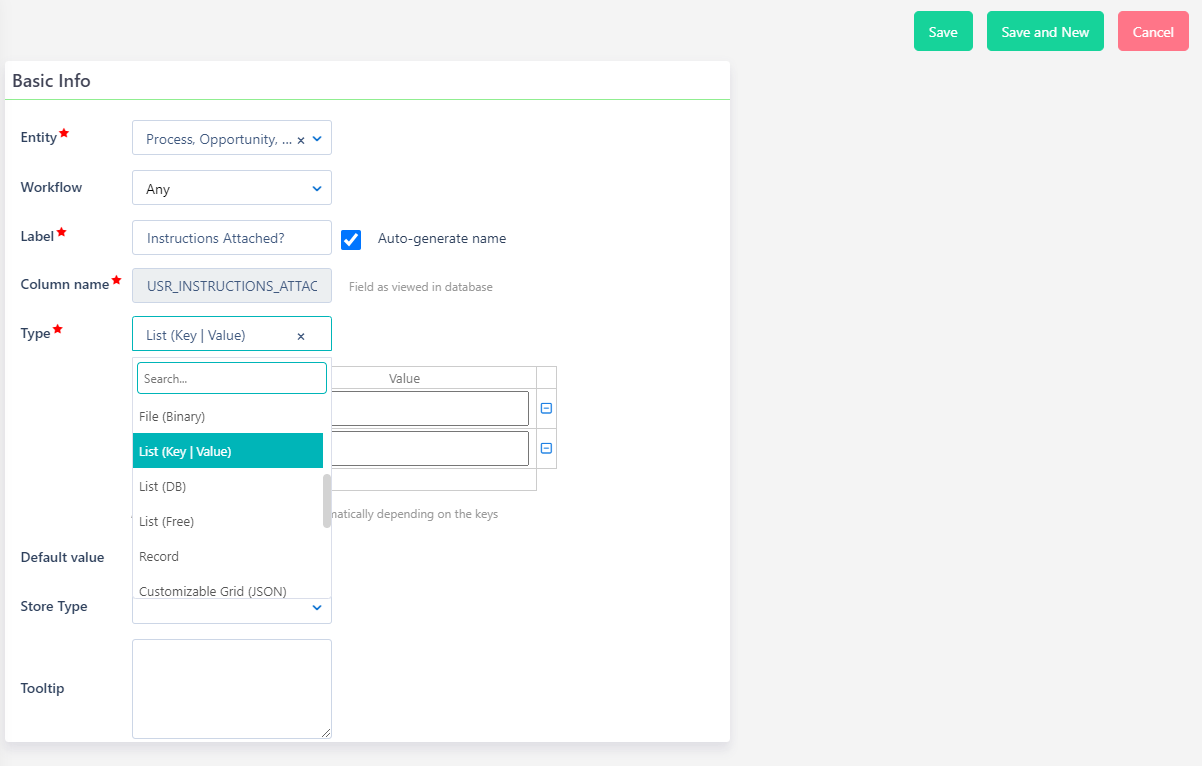
- Select the Entity (e.g. Accounts, Contacts, Processes, Tasks, Personnel, etc.) where you need to add the User Field.
- When it comes to Workflow fields, you should better create them via the Workflow unit instead. So in the Workflow field choose “Any”. Also, if you want to create a Global field, do not link it to a Workflow, by choosing “Any” once again. In case a connection to a Workflow is needed, choose the Workflow name from the list that will appear here.
- Add the Label, which is the field name as viewed by final users.
- Check the Auto-generate name if you want to automatically create a Column name for your field. If you leave it unchecked, you will have to give a Column name in the database; should be one word (e.g. USR_REFERRAL).
- Select the Type of the field in the Database from a variety of types through a drop-down list.
Here are some examples of Types:
- Text Field
- Email, which is a text field whose format should be: test@test.com. Designers can incorporate email fields so end-users can view the email address and copy it into their clipboard by clicking on the respective button, saving their valuable time. Also, an email icon will be displayed next to the field in the form so that end-users can send emails by clicking on the mail button and using their computer’s default application.
- Paragraph (Memo), for the longer text of multiple characters. In the form designer, you can apply properties to have plain or rich text, add placeholder, tooltips and more.
- Checkbox Field
- Date Field
- Time Field
- Timestamp, a Field with Date and Time
- File (Binary), for uploading all types of files
- List (Key | Value) is a drop-down List. Define Value List: Key “1,2,3” and Value “Text1,Text2,Text3” for a drop-down list with 3 options.
- List (DB) will display a database list. Choose from existing Lists, or create a new one.
- List (Free) will display a list of records depending on a select query.
- SELECT FIRST_NAME FROM JP_CONTACTS
- or just the name of the entity, and it will show the respective primary field.
- Record will display a list of record entries in Comidor tables. Choose the record list of the Unit you need. List: eg. JP_TASKS, JP_USERS, JP_CONTACTS, etc. if you want to fetch a list of the tasks, users, contacts, etc.
- Customizable Grid (JSON) refers to a JSON table. Grid Columns Title, Type, etc. should be added. As you can see in the picture below, you build a table in the way you want. Simply choose the columns you want to have and set a Title and Type. Based on the field type you choose, complete the Column size accordingly; you may have to fill in another field, e.g. in the type Pre-populated list you have to fill in the Options [Prepopulated List] with the options you wish your list to have. You can also fill in the Tooltip field with information that will help the user during the submission.
- Choose Phone type for entering phone numbers as input. A phone icon will be displayed next to the field in the form so that end-users can make calls by clicking on the phone number button and using their computer’s default application.
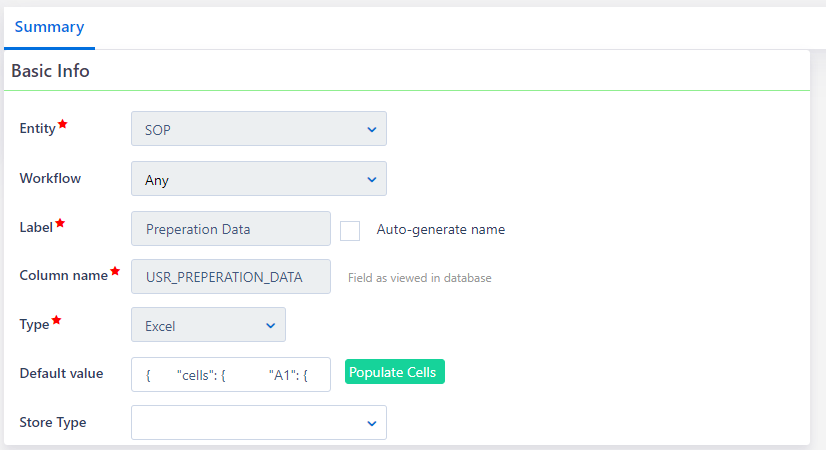
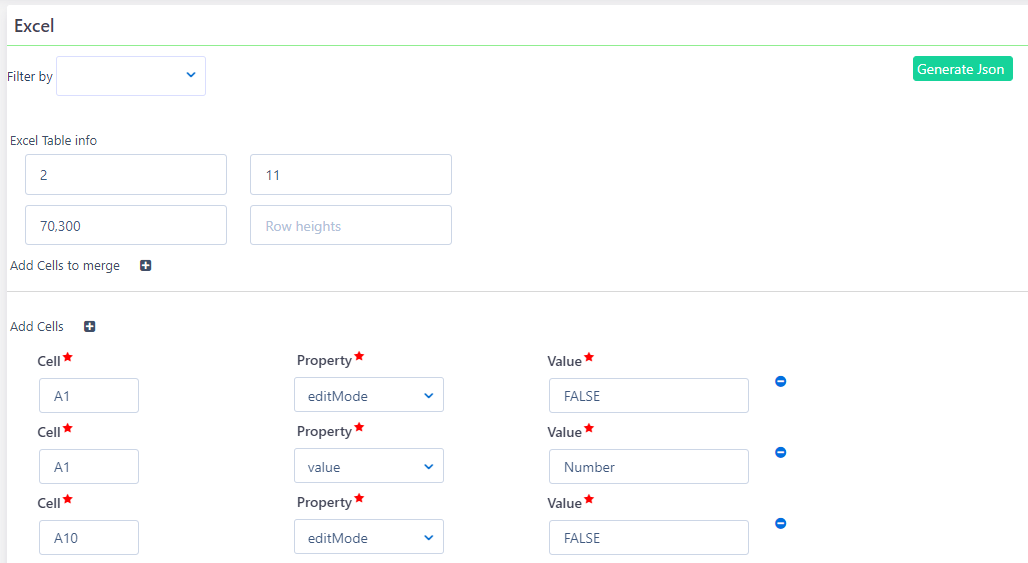
- Choose Excel type for creating an excel spreadsheet that can be later filled in by users inside the main form during process execution.
- To create a Query field, select Type Query. Then Query Properties Key and Value should be added.
- For example, add key “select_query” and value “SELECT FIRST_NAME FROM JP_CONTACTS”.
- add key “where_clause” and value “FIRST_NAME LIKE ‘%MARIA'”.
- Select Number (9digit) or (15digit) depending on the size of the field you need.
- For currencies choose type Currency.
- Finally, for numbers with decimals, choose the field type Decimal up to 2 or 5 decimal digits.
Contact support@comidor.com to get extra advice on custom user field creation.
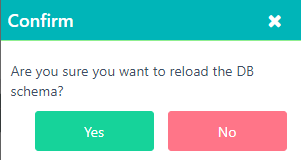
After saving the User Field you created, you will be requested to Reload Database so as the fields to be loaded in the system.
![]()
Creating a new User Form
All User Fields should be a part of a User Form. To create a new Global User Form, you should be a System Administrator.
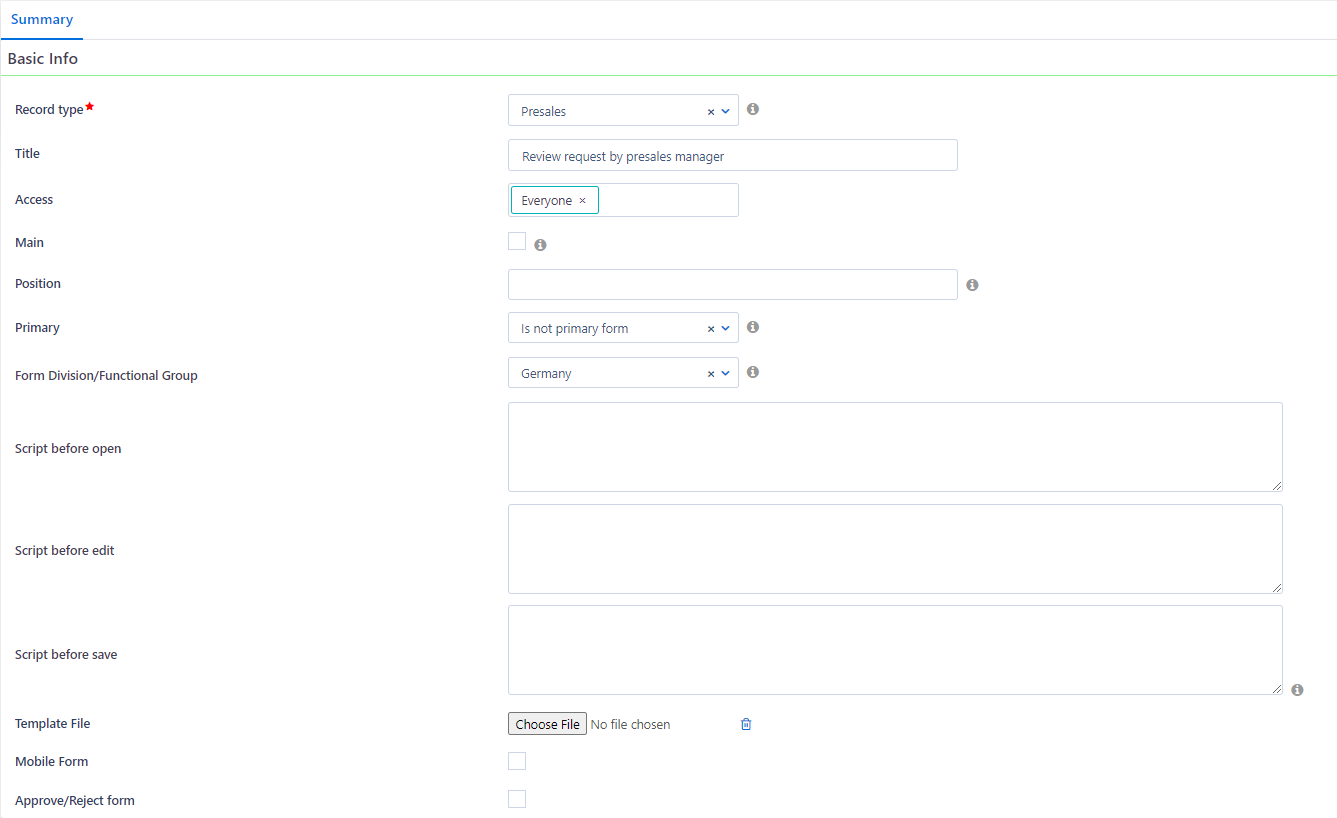
- Firstly, you need to select a Record type, so as the form to be available in this entity group.
- Then, continue with the Title of form.
- Access on this form; here you may select specific users/groups to have access to this data. By default “Everyone” is chosen.
- If you need this form to be Main this means that it will be visible in the main (process) view; this is suggested to be unchecked only in some Workflow Task cases. So, you have to decide if you want this form to be visible only inside the task or in the main process, too.
- Given the fact that this form is Main, you may specify its Position among the other forms that exist in this Record.
- In the field Primary choose Is not primary Form (default), or Replace existing form (primary will be deleted) or Retain existing form (primary will be followed by the user form you are creating).
- Access can be driven also based on the Business setup.
- Add scripts that will run before you open, edit, or save the form.
- Upload a Template file that can be used in extracting documents during the runtime of the workflow.
Form Designer
- After saving the form, you are able to design and organize your form your way.
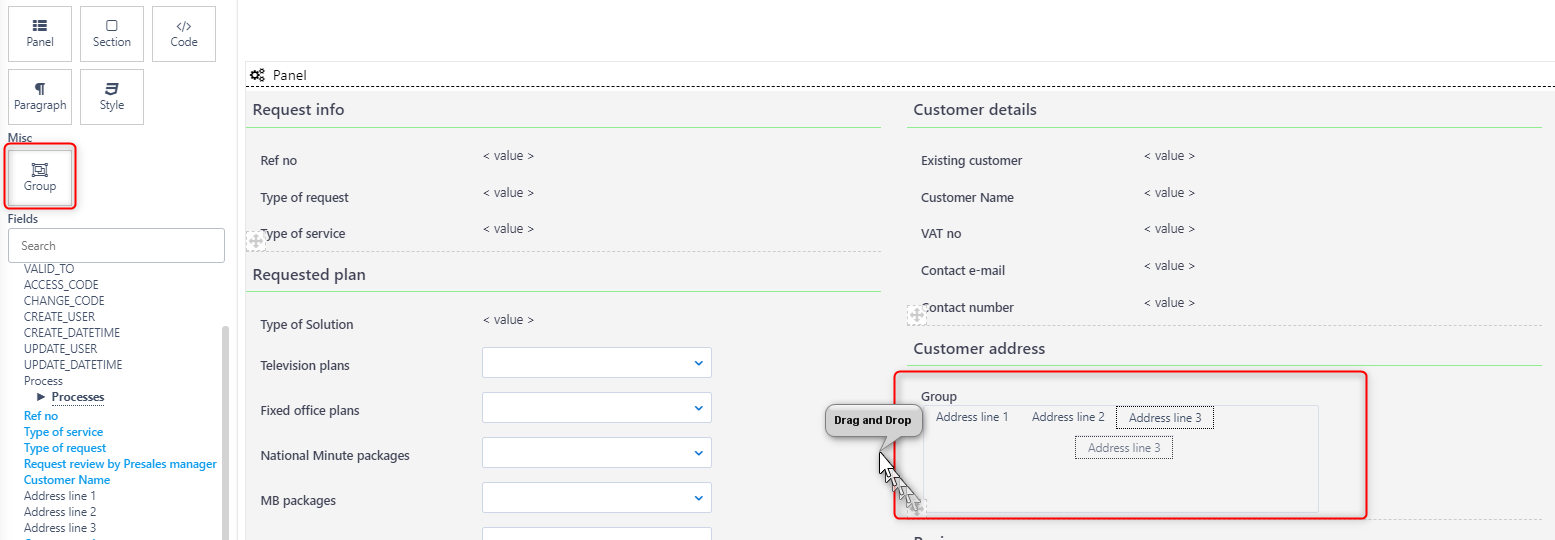
- Design your Form by inserting Sections, Paragraphs, or Code blocks. Simply drag-n-drop the block you wish on the page.
- In Sections, you can add as many fields as you wish with drag-n-drop functionality.
- In Paragraph, you can type your text, either in simple text or with an enriched HTML editor. Keep in mind, that you can add a value of a custom or database field that is being used in the process/app, as a variable in your paragraph.
- In Code, advanced users can add a Procedure.
- In Style, you can customize the font colors, font size of headers, labels, etc.
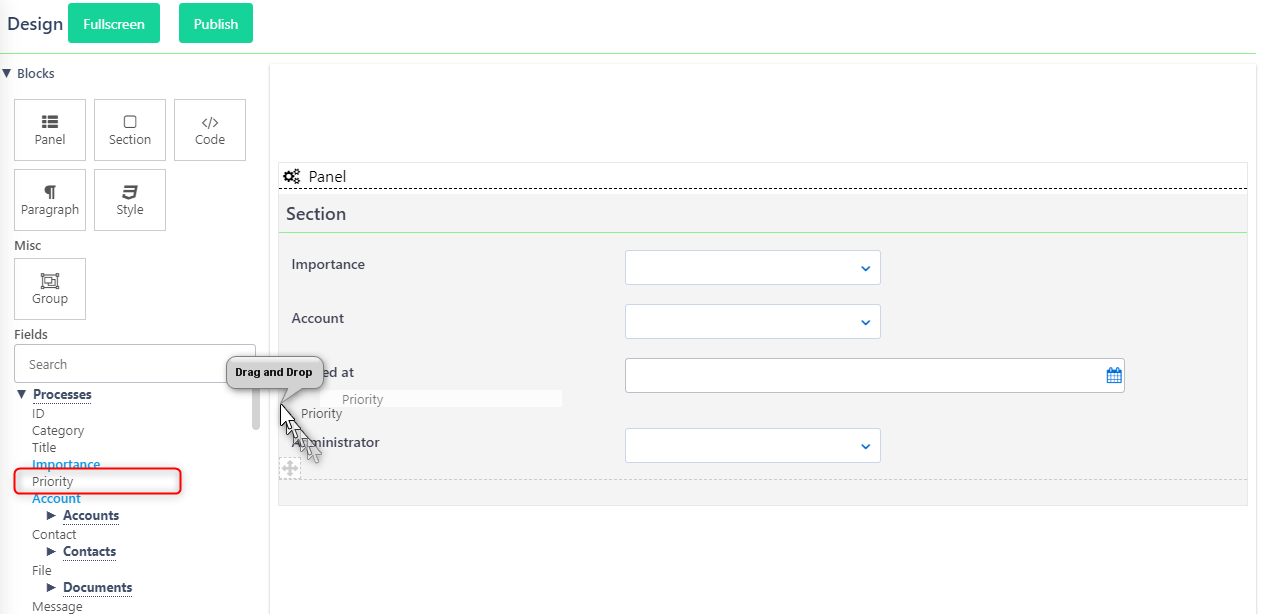
- In Group, you can create a group of fields. Simply drag-and-drop the User fields from the list of available fields and arrange their position.
-
-
- After publishing the form, the grouped fields will be displayed in one row.
-

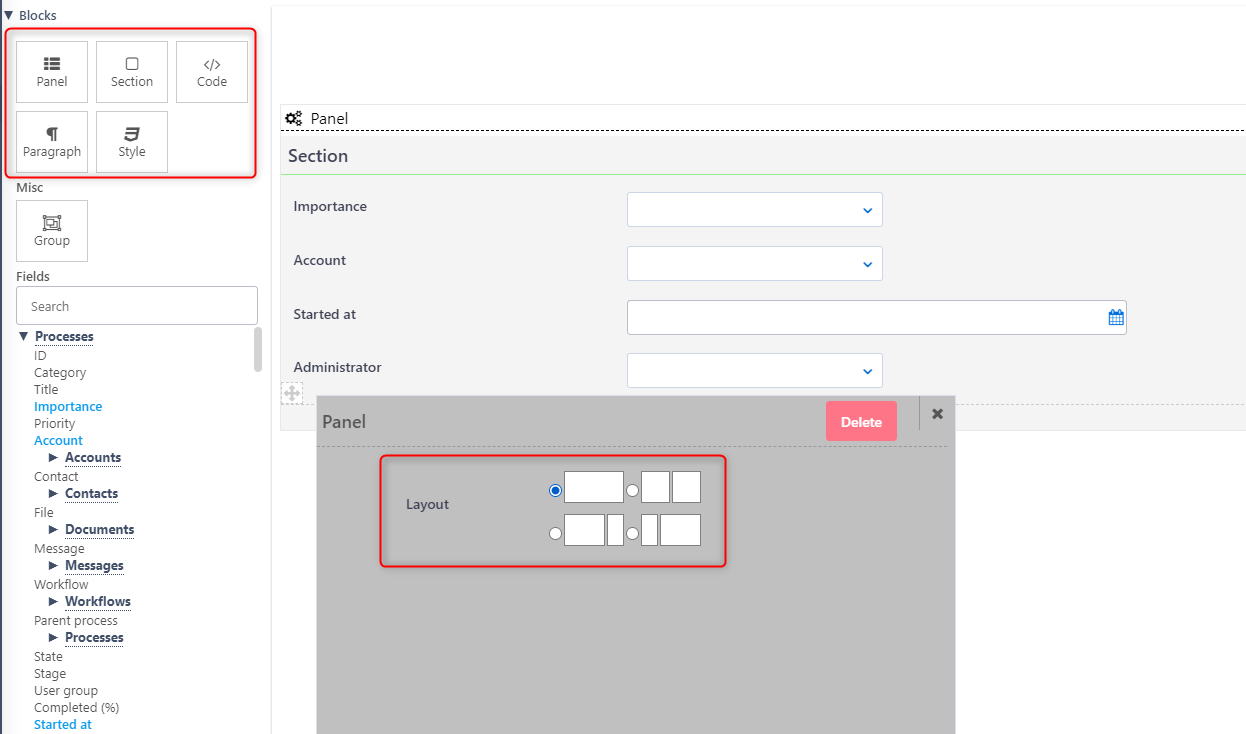
- Click on one of the blocks and edit, rename, or delete the block in the window that appears.
- Select the Page Layout of your preference.
- Re-arrange the components in the way you wish, if you have created more than one.
- Search database fields and/or custom fields from Available fields List and then drag-and-drop them to Used fields list inside the Section you have created.
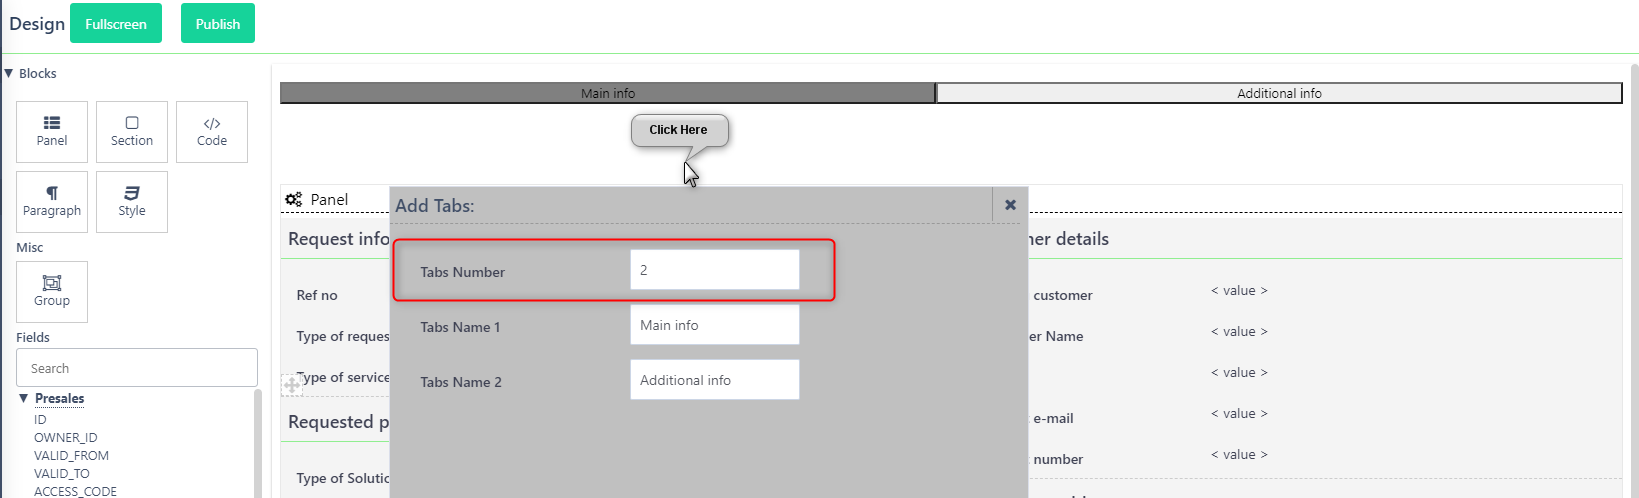
- Add more than 1 tab to group your form in the way you wish. Click above the panel, and select the number of tabs you want. Give the names of the tabs and click on the respective tab to add the fields you want.
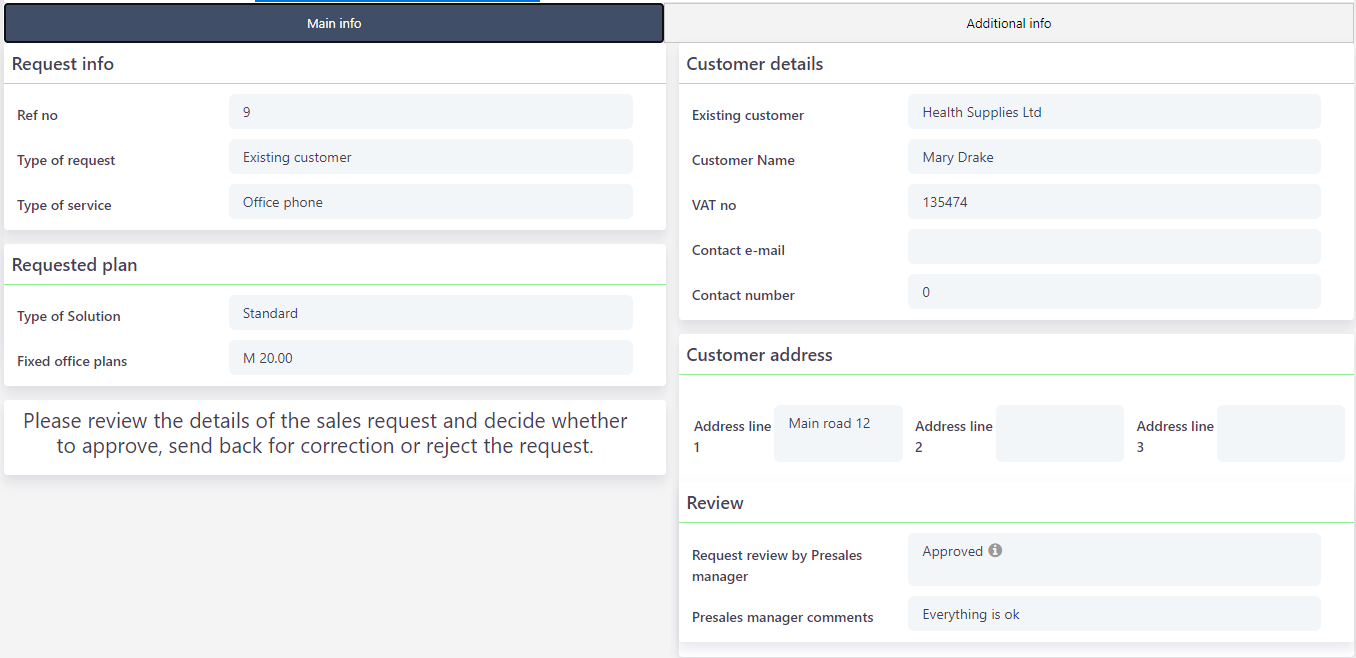
- After publishing the form, the tabs will be displayed as shown below.
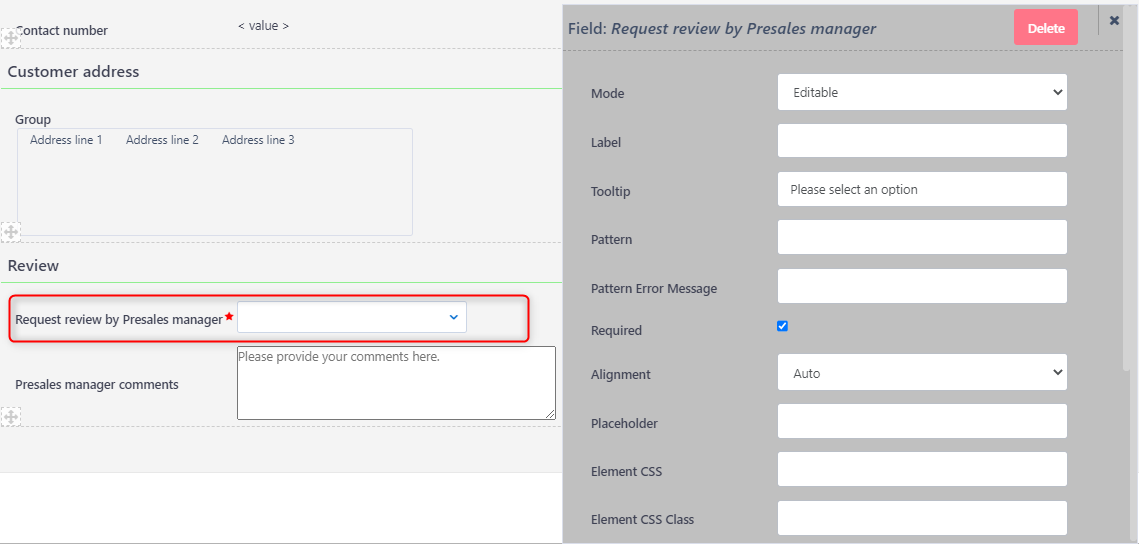
- Edit User Field details, by clicking on a field and then you may:
- Choose mode Editable or View-only if you wish this field to be disabled in this form
- Change the Label name of the field
- Set a Tooltip or a Placeholder for the field
- Set the field as mandatory by checking the Required box
- Define the alignment of the field
- Change the Label position and size of the field
- Set an Element CSS or an Element CCS Class for improving field design
- Hide or unhide the field based on different properties
- Change the editing interface (Plain Editor, Rich Editor)
- Delete the field you have added in this section
- Drag-and-drop to re-arrange user fields within the user form
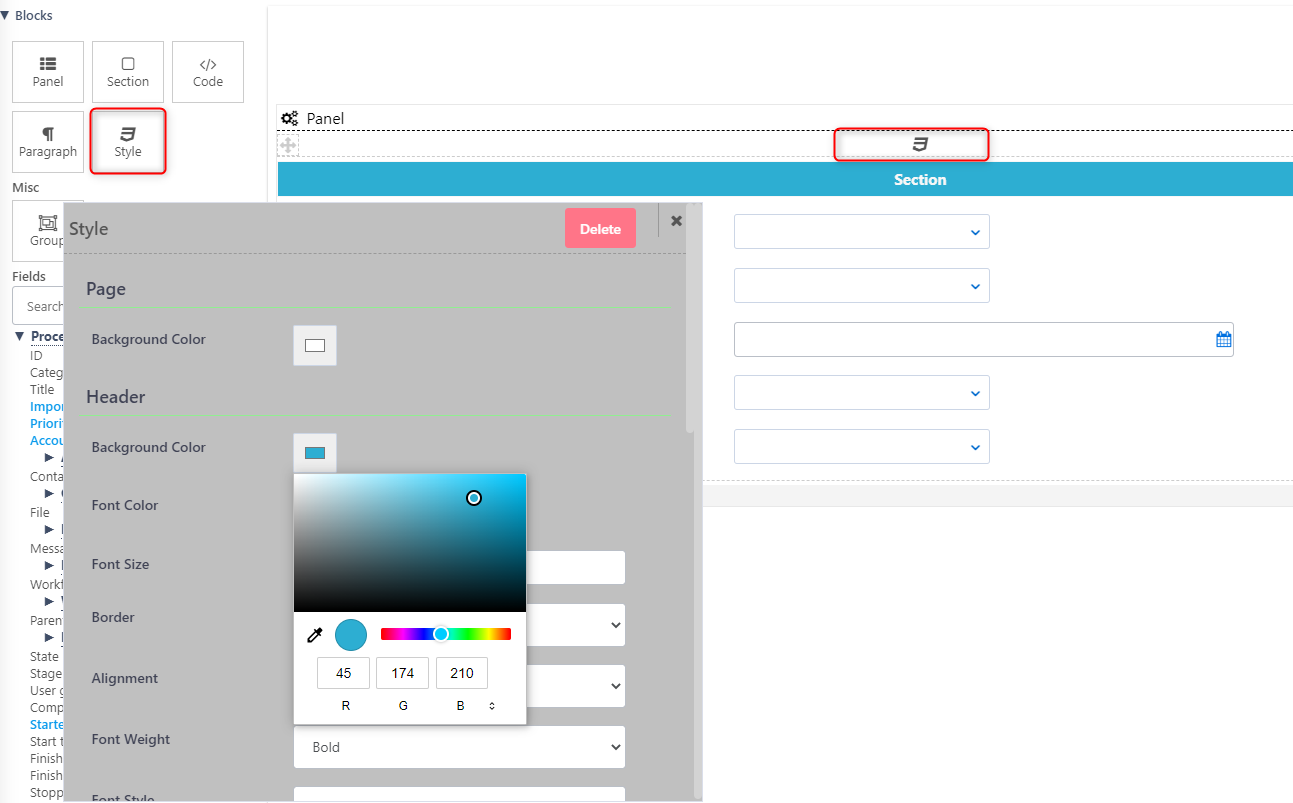
- Drag-and-drop the “Style” tile and define:
- the background-color
- the header background color, font, size, border, alignment, etc.
- the label background color, font, size, etc.
- the input background color, font, size, etc.
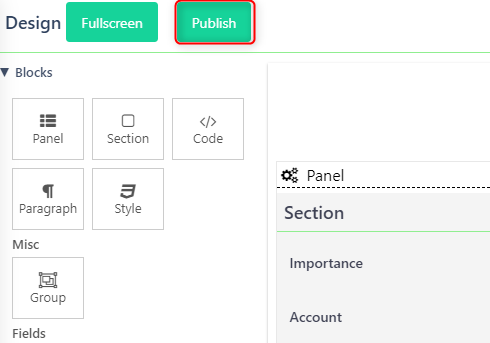
- Click on Fullscreen to view the form in full screen
- Press the Publish button, when form editing is completed
Workflow/Process Template User Fields and Forms
To manage User Fields and User Forms for Workflows, go to App Factory icon > Process Automation > Workflows. Access the Workflow you are working on and select the tab User Forms or User fields.
The same can be performed inside the Process Templates using (Business Apps icon > Process Orchestration > Process Templates), having also here the ability to create a Quick form for Quick adds.
Creating a new User field in a Workflow/Template
Clicking on the “+” button, the creation user field form opens.
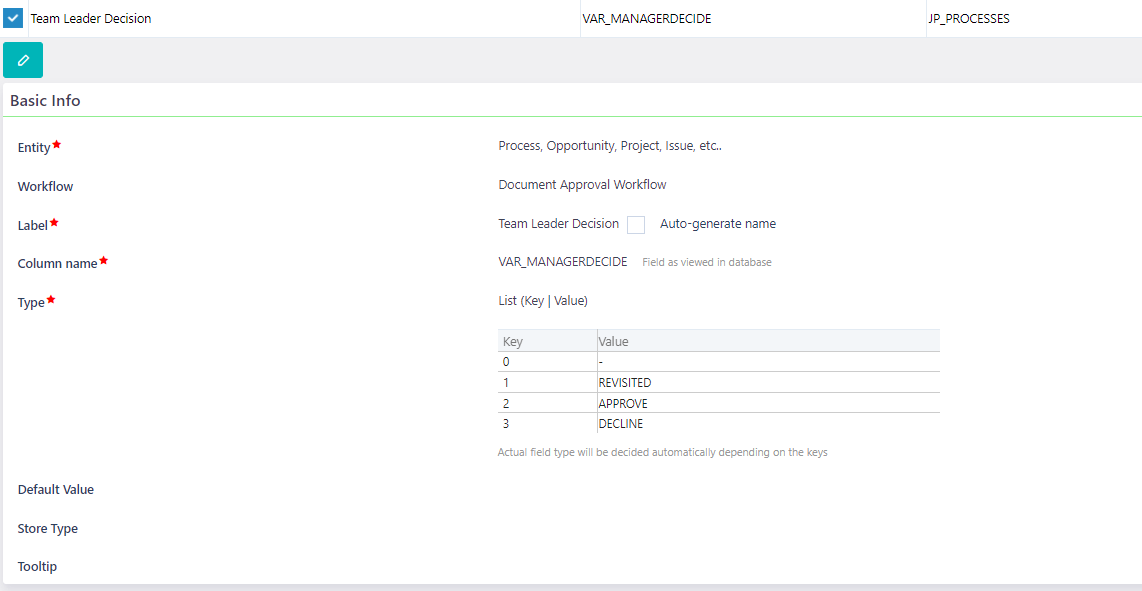
- Add the Label, which is the field name as viewed by final users.
- Add the Column name, which is the field name as viewed in the database; should be only one word (e.g. USR_REFERRAL)
- By default, the option Auto-generate name is checked, so the Column name to be auto-populated. If you wish to change it, uncheck this option and the Column name field will be editable.
- Select the Type of the field in Database.
- Add a Tooltip that will be displayed whenever the cursor is positioned over the field and that will provide useful information.
Here are some examples of Types:
- Text Field.
- Email, which is a text field that should be of test@test.com form.
- Paragraph (Memo), for longer text of more characters.
- Checkbox.
- Date Field.
- Time Field.
- Timestamp, a Field with Date and Time.
- File (Binary) for uploading all types of files.
- List (Key | Value) is a drop-down List. Define Value List: Key”0,1,2″ and Value”-,Text1,Text2″ for a drop-down list with 2 options.
- List (DB) will display a database list. Choose from existing Lists.
- Record will display a list of record entries in Comidor tables, choose the record list of the Unit you wish. List: eg. TASKS, USERS, CONTACTS, etc. if you wish to fetch a list of those tables.
- Customizable Grid (JSON) refers to a JSON table. Grid Columns Title, Type, etc. should be added.
- Choose Excel type for creating an excel spreadsheet that can be later filled in by users inside the main form during process execution.
- In order to create a Query field, select Type Query. Then Query Properties Key and Value should be added.
- Select Number (9digit) or (15digit) depending on the size of the field you want.
- For currencies choose type Currency.
- Finally, for numbers with decimals, choose the field type Decimal up to 2 or 5 decimal digits.
Contact support@comidor.com to get extra advice on custom user field creation.
After saving the User Field, you will be requested to Reload Database so as the fields to be loaded in the system.
Creating a new User Form in a Workflow/Template
All User Fields should be a part of a User Form. From the Modules Menu icon, go to Business Automation > Workflows. Enter the Workflow you are working on and select the tab User Forms.
You need to add:
- Title of the form
- Access to the form; here you may select specific users/groups to have access to this data
- If you need this form to be Main this means that it will be visible in the main (process) view; this is suggested to be unchecked only in some Workflow Task cases. The form can be visible inside the task and/or in the main process.
- Given the fact that this form is Main, you may specify its Position among the other forms that exist in this Record.
- In the field Primary choose Is not primary Form (default), or Replace existing form (primary will be deleted) or Retain existing form (primary will be followed by the user form you are creating).
- Access can be driven also based on the Business setup.
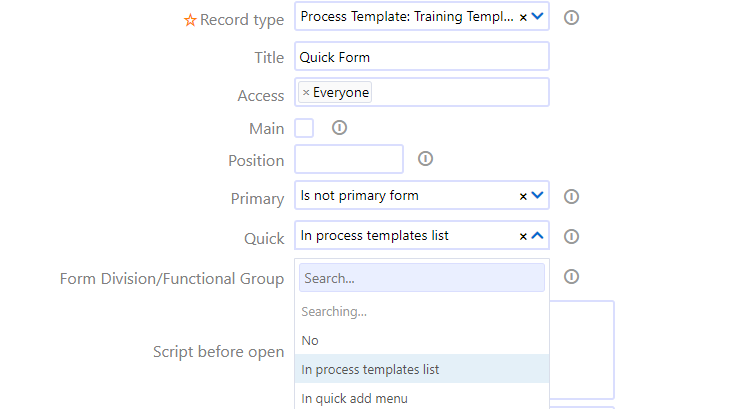
For Process Templates, in the “Quick” field you may select In the process templates list, so as to be available in the process template list in the quick add process. Alternatively, choose in Quick add menu in order to use it directly at the Quick Add button.
Managing a User Form
- After saving the form, you are able to design and organize your form your way.
- Design your Form by inserting Sections, Paragraphs, or Code blocks. Simply drag-and-drop the block you want on the page.
- Click on one of the blocks and edit, rename, or delete the block in the window that appears.
- Select the Page Layout of your preference.
- Re-arrange the components in the way you want, if you have created more than one.
- Search database fields and/or custom fields from Available fields List and then and drag-and-drop them to Used fields list inside the Section you have created.
Extra actions which can be performed:
- Edit User Form details or perform actions such as Delete or Link.
- You can add a Block, a Component like a Panel, Section, Paragraph, Code, Style, or Group.
- Click on Fullscreen to view all of them in full screen.
- Re-arrange the components in the way you want, if you have created more than one.
- Drag-and-drop to re-arrange user fields within the user form.
- Click on a field to display the field settings
- Check the Required box to make it a mandatory field
- You can also lock a field, to make it view only by changing the Mode to View-only
- Do not forget to Publish, after editing the form.
- Save time by clicking on Copy Forms. All fields, sections, and properties will be copied as well.
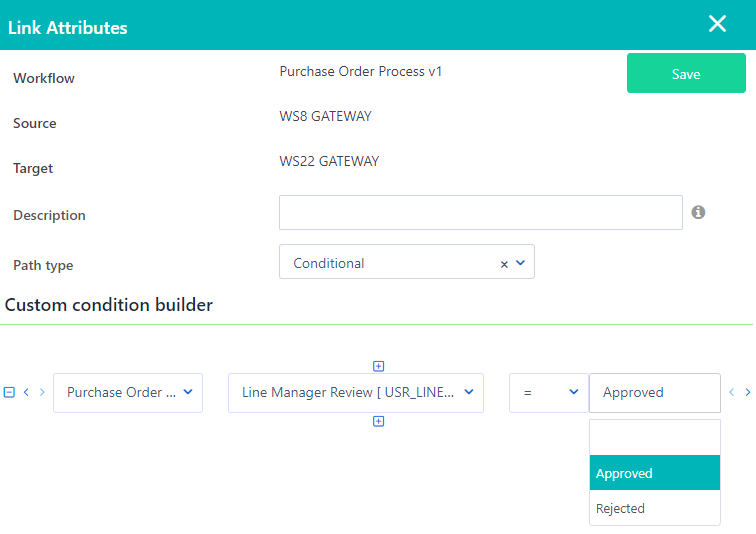
Applying a Workflow User Form in a Workflow Activity
The form should be matched with a specific Workflow activity to be functional.
Get advice on how to apply a form in a Workflow activity from Workflows help center.

User Fields in User Forms of a Workflow can be used in the Conditional flow of a Workflow, too.
Public Form
Public forms are embedded forms similar to the quick add forms in Comidor, including all user fields and business rules. Public forms allow non Comidor users to trigger internal processes. This feature is available to all quick add forms of user applications.
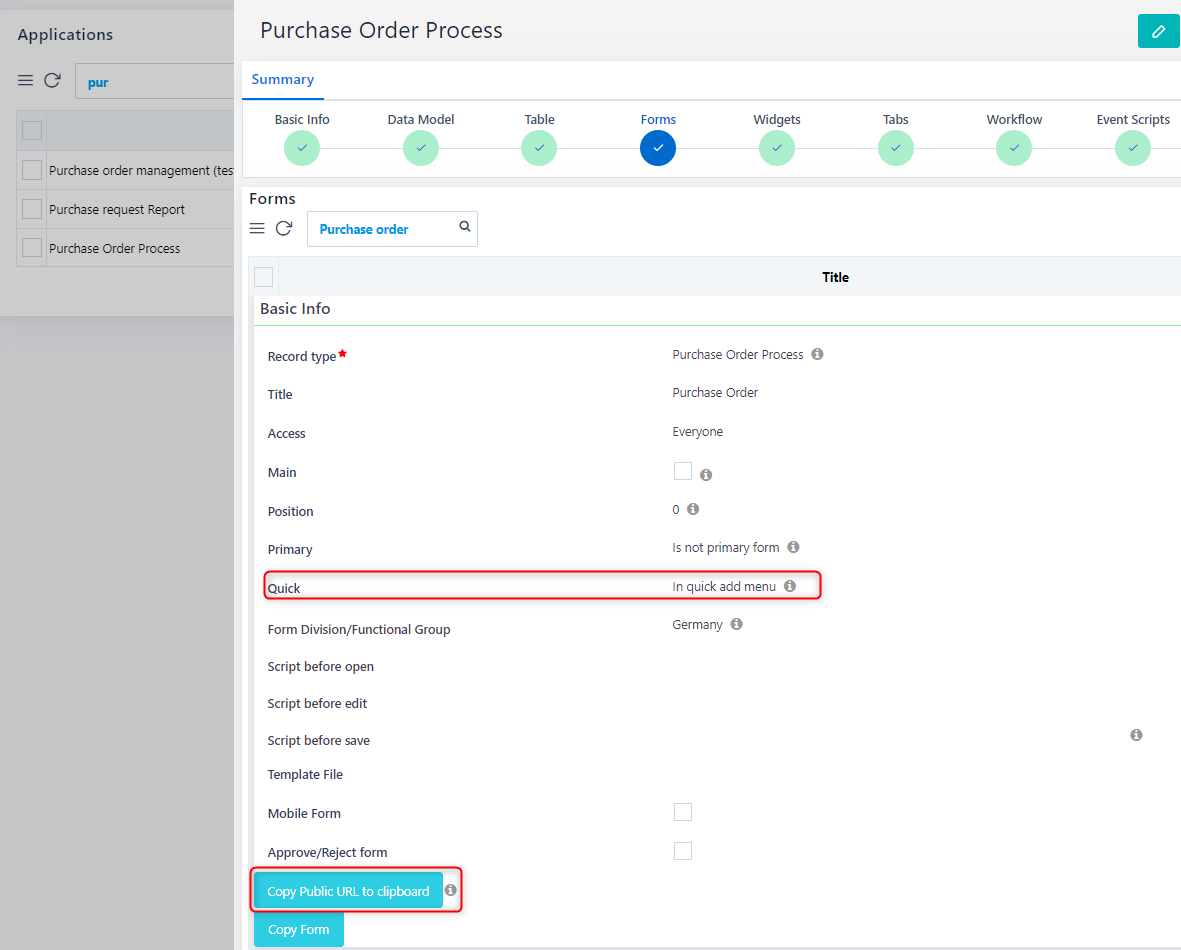
Simply go to the application you want:
- Go to App Factory icon > Application Builder > App Builder
- Select the user application you wish to add the public form
- Go to step 4 – forms and open the quick add form
- Click on the button “Copy Public URL to clipboard”
- Paste the URL to a browser
You can also add Comidor public forms to your website and allow non Comidor users to trigger your application.

By completing the public form and clicking on “Save”, a new process starts in Comidor in the application summary table you have selected.
Field Rules
The field rules functionality enables you to hide or show fields inside forms when certain conditions are met.
- Create custom condition scenarios for fields and select in which scenario the fields are going to be shown or hidden.
- Select more than one scenario – field condition for a specific field. This enables you to cover multiple scenarios.
- Eliminate the number of forms that need to be created and make your adjustments to one simple form.
- Hide sensitive information which should be displayed only for certain users, roles, or groups in a workflow.
To access Field Rules go to the App Factory icon > Process Automation > Workflows. Access the Workflow you are working on and select the tab Field Rules.
Create Field Rules
To create a new Field Rule press on the “+” button, and a creation form opens.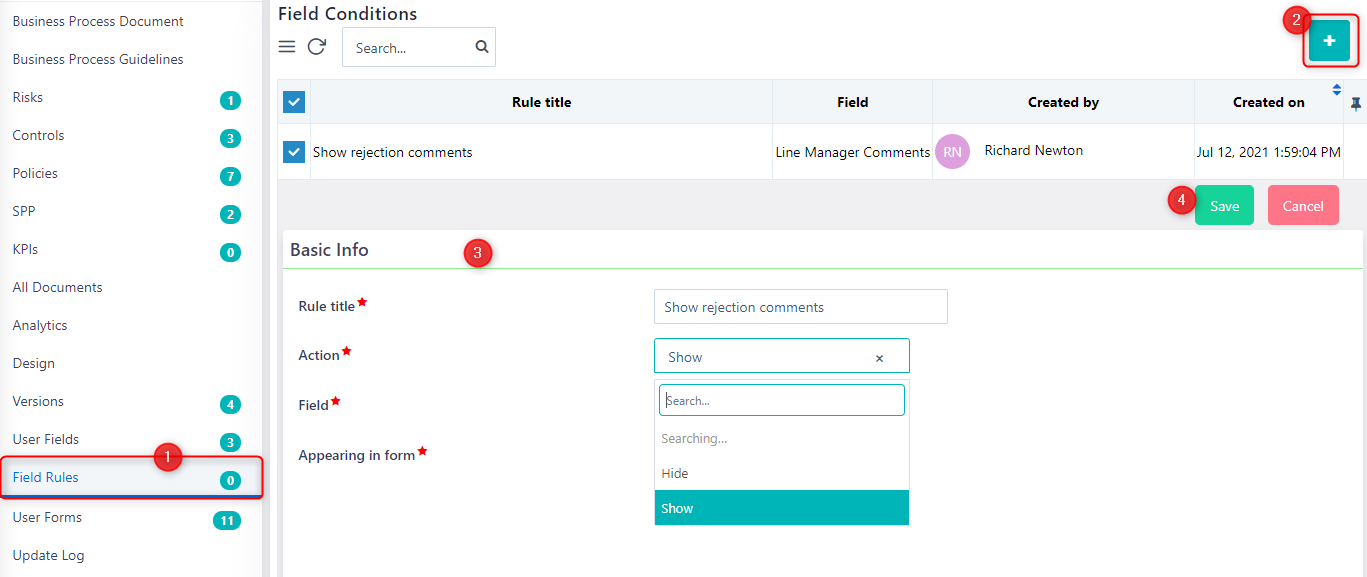
- Give a Rule title
- Select the Action to be performed: you can either Hide or Show a field
- Choose the name of the User Field that you wish to perform the above action to
- Set in which Form you wish this rule to be applied (from the user forms that the selected field is displayed)
- Select the desired Save option (refer to Quick Reference Guide)
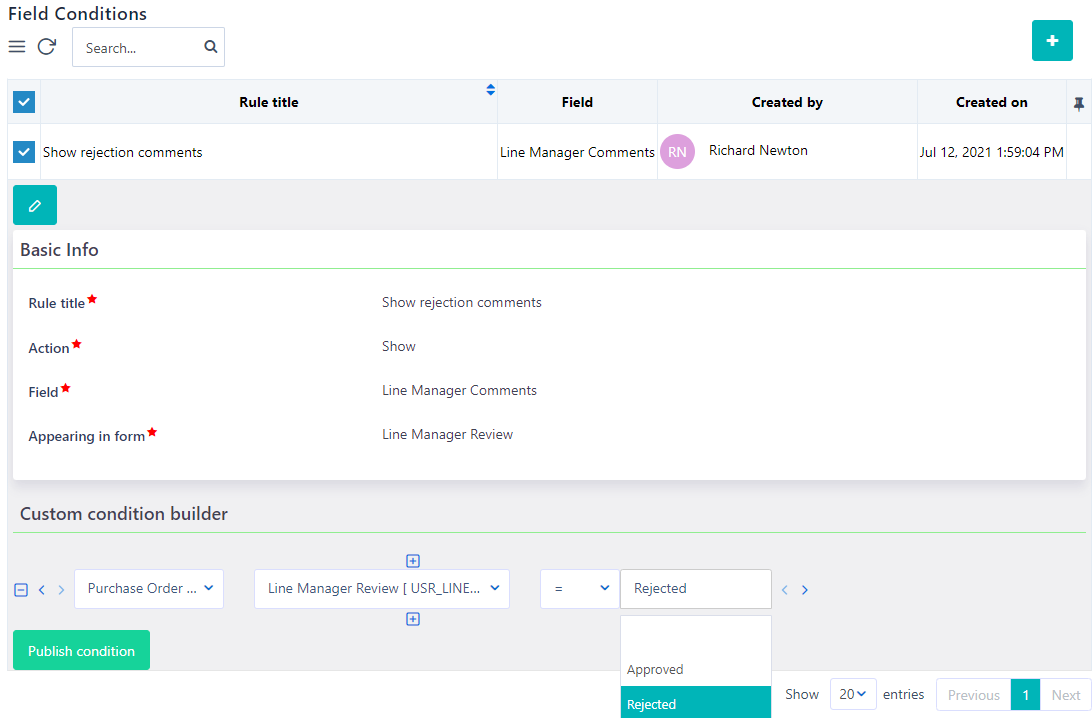
Custom Condition Builder
After saving the Field Rule, and while being at the view form, you can add conditions.
- Click on the ‘+’ icon to insert a new row
- Select the unit that the field comes from (Process, Application name, etc.)
- Choose the Name of the Field and its value
- Use AND, OR, and parenthesis to form your conditions
- After adding all the rows of conditions you need, click on the Publish condition button.
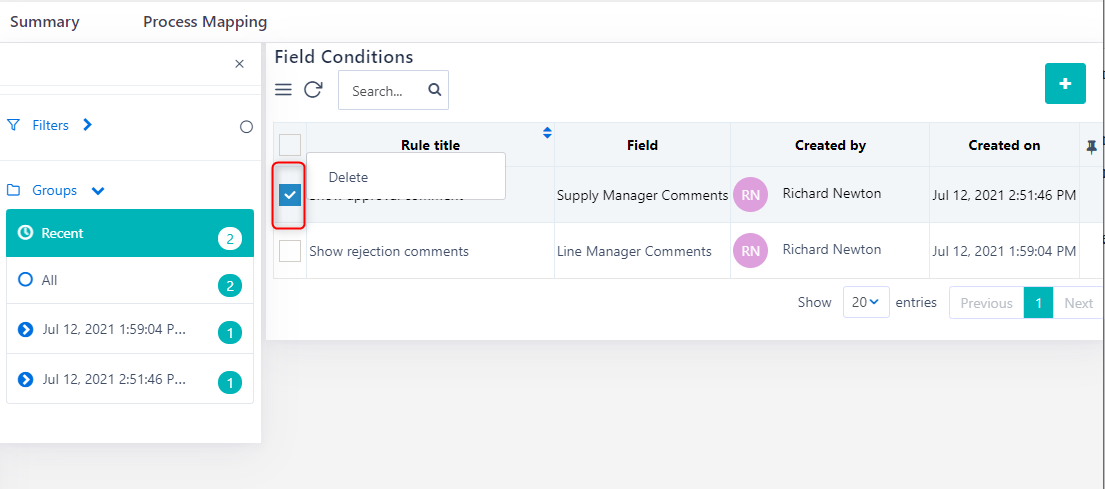
Manage Field Rules
- If you want to make any changes to a Field Rule, simply select the respective Field Rule and click on the pencil icon.
- After making any changes click on Save.
- In order to change the conditions, simply make the changes you wish in the view form of the Field Rule, and then, press the Publish condition.
- You can Delete one or more Field Rules, by multi-checking them in the Field Rules table and then click on Delete.